


 FxWirePro: EUR/AUD regains upwards momentum but unable to hold above 50%fib level
  FxWirePro- Woodies pivot (Major)
  FxWirePro: GBP/NZD maintains bersish bias with focus on 2.2900 level
  EUR/JPY Holds Bullish Bias as Euro Extends Recovery
  FxWirePro: USD/CAD runs out of steam but maintains bullish outlook
  NZD/JPY Flatlines Near 94.60: Will Key Support Reignite the Uptrend?
  FxWirePro: USD/ZAR firms ahead of Fed interest rate decision
  FxWirePro- Woodies pivot (Major)
  FxWirePro- Major Pair levels and bias summary
  FxWirePro- Major Pair levels and bias summary
  FxWirePro: USD/ CNY remains soft ahead of Fed decision
  FxWirePro- Major Crypto levels and bias summary
  FxWirePro:EUR/NZD gains some upside momentum but still bearish
  FxWirePro: GBP/USD edges lower ahead of Fed policy verdict
  EURUSD Spikes to 1.14306 on Fed Pause as Traders Eye Sell-the-Rally Setup


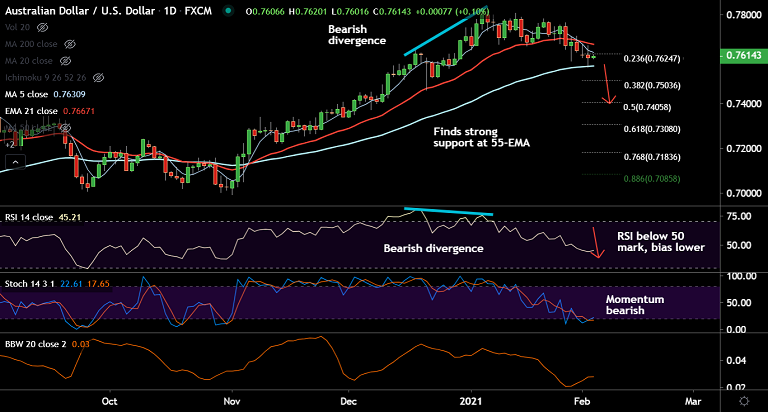
AUD/USD chart - Trading View
AUD/USD was trading 0.09% higher on the day at 0.7613 at around 04:00 GMT after bouncing off 55-EMA support on Tuesday's trade.
The Australian dollar was dented post RBA Governor Lowe's comments, but upbeat Chinese Caixin Services PMI data kept downside limited.
RBA’s Lowe repeating the central bank’s dovish statements said that she does not expect that inflation goals will be met before 2024.
Earlier in the day, Australia’s Building Permits rose past-15.0% YoY and 2.6% MoM figures to 22.8% and 10.9% respectively in December. Also, Commonwealth Bank Services PMI eased to 55.6 from 55.8 previous mark.
Broad-based US dollar retreat, in response to the US stimulus optimism also aids to keep downside in the pair limited.
Near-term technical bias for the pair remains bearish. However, analysis of GMMA indicator shows major trend is bullish.
55-EMA is offering strong support at 0.7596. Further weakness only on break below. Resumption of upside likely on retrace above 21-EMA.


