FxWirePro: USD/ZAR dips as rand firms on stronger economic data
  Yield Surge Sinks EUR/USD: Technicals Point to Sell-on-Rallies Near 1.1320
  FxWirePro: EUR/NZD stuck in a range but outlook is bullish
  NZD/JPY Technical Analysis: Sell-on-Rallies Strategy Eyed Below 90.80 Resistance
  FxWirePro: GBP/USD cedes early gains, outlook bearish
  FxWirePro- Woodies Pivot
  AUD/JPY Technical Outlook: Fading the 100-Pip Rally Near 110.25 Resistance
  FxWirePro: USD/JPY rebounds above 157 as dollar firms
  JPY major currency score with the bearish pairs NZDJPY, GBPJPY, AUDJPY, EURJPY, CHFJPY, CADJPY
  FxWirePro: GBP/AUD extends gains after stronger UK second-quarter growth
  FxWirePro: USD/CAD sustains gains as uptrend remains strong
  FxWirePro: GBP/AUD loses momentum but outlook is bullish
  FxWirePro: GBP/NZD extends gains, eyes 2.3600 level
  Major pair currency score: EURUSD, NZDUSD, AUDUSD extremely bearish, USDCAD, USDCHF bullish
  EUR/JPY Technical Outlook: Selling the Rallies Near 178.50 as Euro Momentum Fades
  FxWirePro: GBP/USD hits three month low, scope for further downside
  FxWirePro- Major Crypto levels and bias summary


 Add as a preferred source on Google
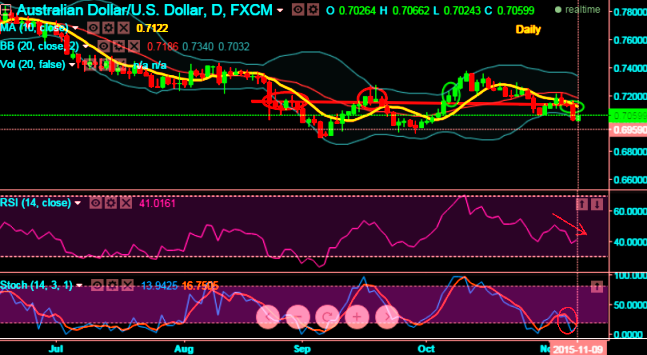
A resembling bearish Marubozu pattern occurred at 0.7035 levels to confirm the breach of supports at 0.7140 levels.
Previously, a gravestone doji was occurred at the same levels on daily charts and the trend on this chart has still been fragile as the leading oscillators are converging downwards with massive price dips.
RSI curve is converging downwards that fortifies bearish sentiments to prevail. Currently, RSI is trending at 40.0290 while articulating.
While %D line crossover is still on even after reaching oversold territory on slow stochastic. No trace of %K crossing over which means bears are still under control over the selling streaks.
Overall, the major trend has been downtrend dominated by the bears with clear volume confirmation, price being fallen below 10DMA and above stated support levels has now exposed towards 0.7007 levels and even retesting 6 and half years low cannot be disregarded up to 0.6965.
Losing streak has been stronger from mid to hit almost 6 and half year's lows. On weekly charts, from last April the pair has been tumbling non-stop to evidence the huge loses.
The implied volatility for near month contracts of AUDUSD pair has been highest among G20 currency pool, likely to perceive at 11.75%.
We recommend on pure speculation basis buying one touch binary puts in order to extract leverage on extended profitability. By employing At-The-Money binary delta puts one can multiply returns by twice, thrice or even pour returns exponentially. But do remember these are exclusively for speculative basis.
The prime merits of such one touch option are high yields during high volatility plays. Wider spreads indicates lack of liquidity. The spreads for one touch AUD/USD options are constant time and barrier levels. Usually, such binary options for every change in 1 pip the relative change in option price 0.01% or even exponential at high implied volatility times.

- News

- Economy

- Central Banks
- Investing
- Research
- Roundups
- Digital Currency
- Insights
- Technical Analysis
- Technology
- Business
- Law
- Health
- Nature
- Fintech
- Science
- Topic
- Opinions
- ©Econometrics LLC . All Rights Reserved.
FxWirePro: AUD/USD relentless downswings on breach of 0.7140, binary puts for target 60 pips
Monday, November 9, 2015 10:19 AM UTC
Editor's Picks



- Market Data
Most Popular