


 FxWirePro: EUR/NZD downside pressure builds, key support level in focus
  FxWirePro: GBP/NZD gains some ground but bias is still bearish
  FxWirePro: AUD/USD gains on Iran-US truce hopes, risk rally
  Major Pairs Action Bias: USDCAD and USDCHF Stand Out as Extremely Bullish While GBPUSD and NZDUSD Turn Extremely Bearish
  JPY Action Bias: Bullish Pairs to Watch Out For
  FxWirePro: USD/CAD gaining momentum for a move towards 1.4200 level
  AUDJPY Action Bias: Bullish Dip-Buy Setup Despite Flat Neutral Bias
  FxWirePro: EUR/AUD outlook weaker on renewed downside pressure
  AUDJPY Weakness Deepens: Sell Rallies Toward 112 as Aussie Dollar Falters
  FxWirePro- Major Pair levels and bias summary
  FxWirePro: NZD/USD edges lower, remains on back foot
  FxWirePro: USD/ZAR uptrend loses steam, remains on bullish path
  FxWirePro: AUD/USD dips after RBA Governor speech
  NZDJPY Action Bias: Bullish Dip-Buying Opportunity on Broad Yen Weakness
  FxWirePro: GBP/NZD downside pressure builds, key support levels in focus
  FxWirePro: USD/CNY dips as yuan firms on improving risk appetite


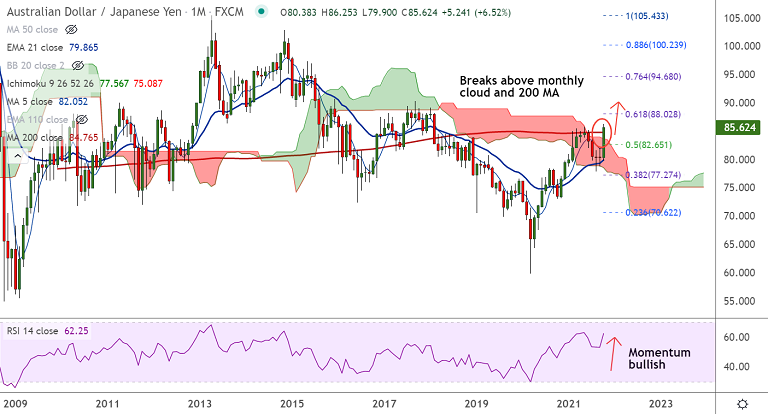
AUD/JPY chart - Trading View
Technical Analysis: Bias Bullish
- AUD/JPY was trading 6.51% higher on the month till date
- Price action has retraced above 200-month MA, raising scope for further gains
- The pair has resumed upside after Doji formation in the previous week
- Pullback has bounced off 200-week MA and weekly cloud
- Momentum is bullish on daily, weekly and monthly charts
Support levels - 85.28 (5-DMA), 85, 84.76 (200-month MA)
Resistance levels - 85.66 (Monthly high), 85.75 (Upper W BB), 86
Summary: AUD/JPY has bounced off 21-month EMA with back-to-back Dojis. Watch out for close above 200-month MA for upside continuation. Next major bull target lies at 61.8% Fib at 88.02.


