


 FxWirePro: GBP/NZD up trend gains momentum but hurdles ahead
  Sterling Surge: GBPJPY Powers Above 214.50 as Triple Bullish EMA Stack Signals Push to 217
  FxWirePro: GBP/AUD maintains bullish bias with focus on 1.9100
  FxWirePro- Major Pair levels and bias summary
  FxWirePro: NZD/USD gains slightly but bearish outlook remains
  FxWirePro: USD/CAD steadies around 1.3920 level , retains bid tonne
  EUR/USD Relief Rally Crashes Into 200/365 EMA Wall: Sell-on-Rise Near 1.1600 Targets 1.1435
  FxWirePro: NZD/USD under pressure amid US-Iran deterioration
  FxWirePro: AUD/USD firms slightly, but downward resumption looks likely
  FxWirePro: AUD/USD eases as middle east peace progress ebbs
  FxWirePro: USD/CNY holds flat amid concerns over Middle East risks and upcoming U.S. CPI
  FxWirePro: EUR/ NZD consolidating around 1.9855, room for further gains
  NZD/JPY Bear Trap: Triple EMA Ceiling Blocks Relief Rally, Sellers Eye 90.50
  AUD/JPY Dead-Cat Bounce Halted by EMA Wall; Sell-on-Rise Eyes 110.50 Target
  USD/CHF Retreats to Key Trend-Line Wall; Buy-Above-0.8000 Strategy Targets Sharp Rally to 0.8150
  FxWirePro- Woodies pivot (Major)


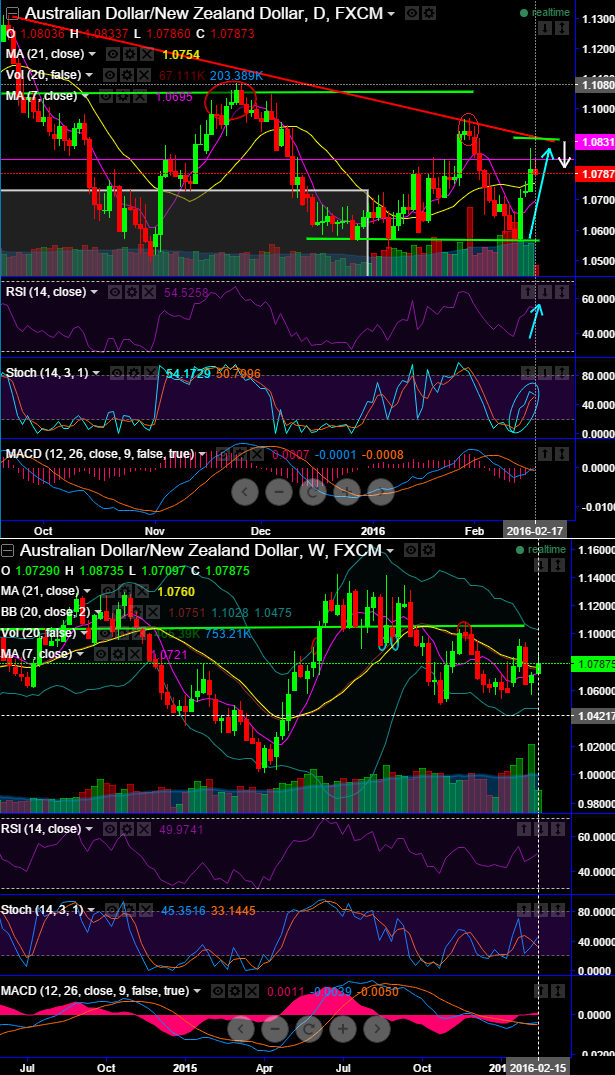
Aussie dollar after 1st half of February's losing streak upto the bottom at 1.0570 that had begun from the formation of back to back shooting star patterns at peaks of 1.0927 and 1.0914 levels, it is now making an attempt of recovery from last three consecutive days as both technical and fundamental indicators are signaling buying sentiments.
On daily chart, the pair has taken a support at 1.0570 to bounce back sharply to the yesterday's peak s at 1.0873, in between this journey bulls have been disregarding and managed to breach the strong resistance at 1.0717 levels (see blue colored horizontal line in which demand is seen more than supply).
Currently, the prevailing prices have bounced above both 21DMA and 7DMA curves. Most notably there is an attempt of 21MA crossing over 7MA on weekly plotting. But this would be viewed whether it sustains on a closing basis or not in order to set up next targets at 1.1017.
Despite some negligible selling pressure we observed healthy momentum in recent rallies as the leading oscillator RSI evidences the positive convergence with the every price bounces, (currently, RSI trending healthily at 54.5258 while articulating).
While, no there is no trace of selling indications from stochastic curve as it shows %K crossover at 50 levels that means that bulls seem to be in total control over rallies in order to bounce above current levels.
The spot FX at this juncture trading at 1.0788 after rejecting today's highs 1.0833 (resistance at 1.0831), if it manages to sustain these levels on a closing basis then we reckon that this pair would certainly approach 1.1017 which is next resistance.
On weekly charting, the prevailing price bounces are in clear conformity to the volumes generation, and prices have jumped above 21MA which means these upswings are likely to drag upwards in the weeks to come.
We conduct this technical outlook, the Aussie dollar is close to the bottom of its undervaluation, supporting our view for AUDNZD upside potential.
Please be noted that the trend being uptrend and we don't want to buck this trend, hence, buy 2W (1%) in the money 0.50 delta call option while shorting 1W (1%) out of the money call option for net debit.
Risk Reward profile: An investor will also turn to this spread when there is discomfort with either the cost of purchasing and holding the long call alone, or with the conviction of his bullish market opinion. Maximum loss for this spread will generally occur as AUDNZD declines below the lower strike price. If both options expire out-of-the-money with no value, the entire net debit paid for the spread will be lost.

- News

- Economy

- Central Banks
- Investing
- Research
- Roundups
- Digital Currency
- Insights
- Technical Analysis
- Technology
- Business
- Law
- Health
- Nature
- Fintech
- Science
- Topic
- Opinions
- ©Econometrics LLC . All Rights Reserved.
FxWirePro: AUD/NZD likely to test trendline resistance at 1.0895 - bulls stay long via debit spreads
Wednesday, February 17, 2016 6:22 AM UTC
Editor's Picks


- Market Data
Most Popular


