


 FxWirePro: GBP/AUD bears maintain upper hand
  NZDJPY Bullish Dip-Buy Setup: 93.60 Support Unlocks Path to 97
  FxWirePro- Woodies pivot (Major)
  JPY Action Bias: USDJPY, EURJPY, and CADJPY Emerge as Top Extremely Bullish Picks
  JPY Action Bias: Bullish Pairs to Watch Out For
  Major Pairs Action Bias: USDCHF Emerges Extremely Bullish as EURUSD and GBPUSD Turn Deeply Bearish
  FxWirePro: GBP/USD downtrend loses steam but outlook still bearish
  FxWirePro: AUD/USD gains on Iran-US truce hopes, risk rally
  FxWirePro: GBP/NZD downside pressure builds, key support levels in focus
  FxWirePro :USD/JPY eases slightly, remains on bullish path
  FxWirePro: GBP/AUD under pressure as pound continues to weaken
  AUDJPY Action Bias: Bullish Dip-Buy Setup Despite Flat Neutral Bias
  BTC, ETH, SOL, XRP, and BNB: Major Crypto Pairs Stay Neutral
  AUDJPY Extends Four-Day Rally on Yen Weakness: Bullish Dip-Buy Eyes 117-118
  FxWirePro: USD/CNY edges higher but bulls lack punch
  FxWirePro: NZD/USD gains as U.S.-Iran peace hopes boost risk sentiment
  FxWirePro: AUD/USD uptrend loses steam, remains on bearish path


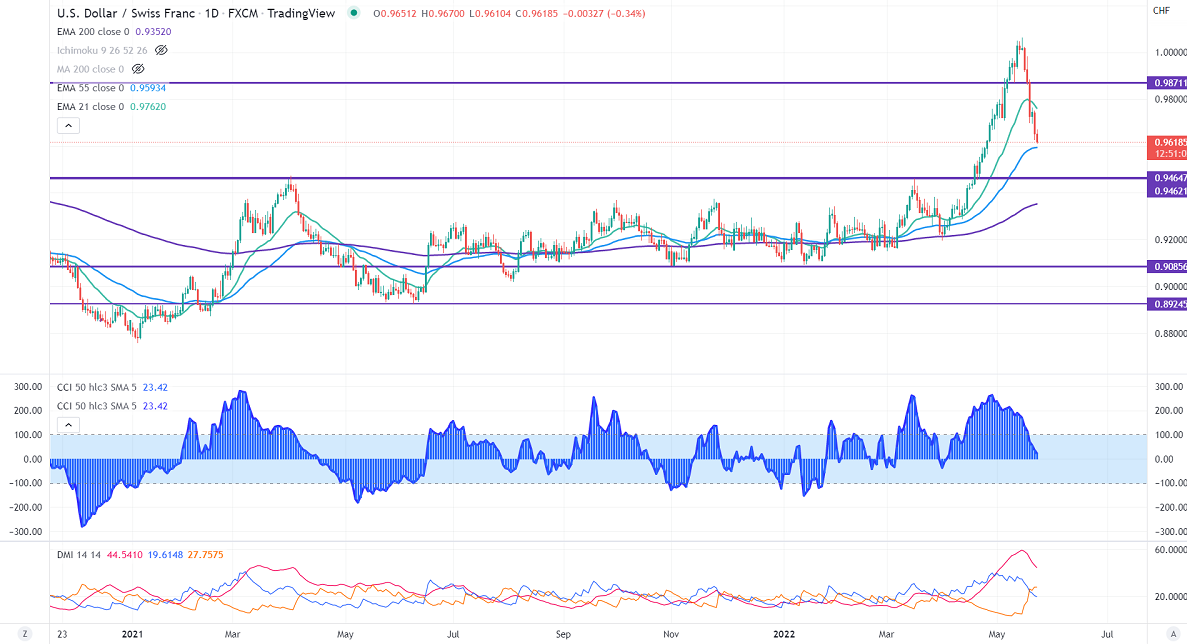
The pair is trading weak for the past five days and declined more than 400 pips. The hawkish comments from the SNB chairman and increase in demand for safe-haven assets support the Swiss franc. Markets eye the US Fed Chairman's speech and flash manufacturing PMI for further direction. According to the CME Fed watch tool, the probability of a 50 bpbs rate hike dropped to 88.8% from 94.9% a day ago.
USDCHF hits an intraday low of 0.96104 and is currently trading around 0.96285.
Bullish scenario-
The primary level to Watch – is 0.9760. Any break above shows a minor bullishness. A jump to 0.9850/0.9900 is possible. Significant bullish continuation only if it breaks 1.0070.
Bearish scenario-
Intraday support – 0.9600. Break below that level will take the pair to 0.9500/0.9460.
Indicators (4-hour chart)
Directional movement index – Bearish
CCI (50) - bearish
It is good to sell on rallies around 0.9648-50 with SL around 0.9700 for a TP of 0.9500.


