


 FxWirePro USD/JPY consolidates above 160.00 level despite fresh currency intervention threats
  FxWirePro- Major Crypto levels and bias summary
  FxWirePro: EUR/ NZD consolidating around 1.9855, room for further gains
  AUD/JPY Dead-Cat Bounce Halted by EMA Wall; Sell-on-Rise Eyes 110.50 Target
  Gold Stalls Below $4150 as Hot CPI Fuels Dollar Strength and Safe-Haven Bid Fades
  FxWirePro- Major European Indices
  FxWirePro: NZD/USD gains slightly but bearish outlook remains
  FxWirePro:GBP/USD recovers some ground but bears are not done yet
  FxWirePro: NZD/USD under pressure amid US-Iran deterioration
  FxWirePro: GBP/AUD maintains bullish bias with focus on 1.9100
  NZD/JPY Bear Trap: Triple EMA Ceiling Blocks Relief Rally, Sellers Eye 90.50
  FxWirePro: GBP/NZD up trend gains momentum but hurdles ahead
  USD/CHF Retreats to Key Trend-Line Wall; Buy-Above-0.8000 Strategy Targets Sharp Rally to 0.8150
  FxWirePro- Major Crypto levels and bias summary
  FxWirePro- Woodies pivot (Major)
  FxWirePro: GBP/AUD eases slightly but trend is still bullish
  Sterling Surge: GBPJPY Powers Above 214.50 as Triple Bullish EMA Stack Signals Push to 217


As anticipated, the RBA board meeting for interest rate decision, has not bring in any change, that the board has decided to hold the cash rate steady at 2.0%. With the market probability of a move near to zero, that is a sharp contrast to some months ago when markets gave a 100% probability to a rate cut by February.
We are bearish on this APAC pair as Aussie produced a lackluster trade balance numbers last week at negative 3.54M to miss the forecasts at 2.50M and a slump from previous flash at 2.727M. While exports have been highly disappointing steep slumps from previous -1% to -5% and imports were unchanged at -1%.
On the flip side, tomorrow's Japanese trade balance and BoJ's negative rates that keeps JPY back in action. We've been observing consistent recovery in JPY against Aussie dollar after the recent central bank's event, the pair has breached strong supports at 85.646 and 81.300 levels, we think the pair has gone fragile to expose next strong supports at around 79.645.
By pushing rates into negative territory, the BOJ is in effect penalizing commercial banks for not lending aggressively by charging the institutions for holding excessive reserves at the central bank.
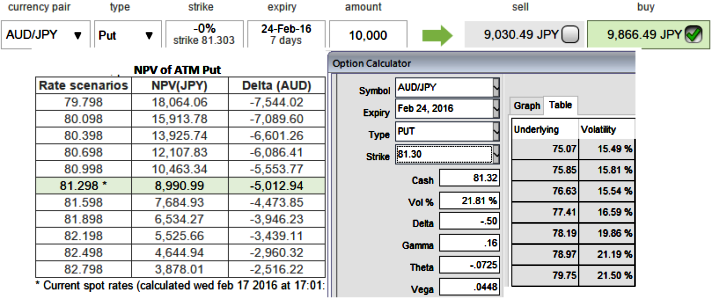
We observe the implied volatility of 1W ATM AUDJPY put contract has been flashing at 21.81%, whereas premiums of the same are trading just above 9% of NPV. Contemplating bearish sentiments coupled with these underpriced ATM puts, we think it makes put ratio back spread strategy more productive as the likelihood of these contracts expiring in the money is quite reasonable.
We reckon that the contracts with spiking IVs cost more, intuitively due to the higher probabilities of the market 'swinging' in as per the research. If IV increases and you are holding an option, this is good. You should also note short-dated options are less sensitive to IV, while long-dated are more sensitive.
Hence, the weights have to be doubled so as to result into huge positive cash inflows for every small change in underlying exchange rate.
As we expect the underlying currency exchange rate of AUDJPY to make a larger move on the downside. So, go long in 3 lots of different striking put options and simultaneously short 4D (0.5%) in the money put option and one more 1W (1%) in the money put options (choose both short sides that should have positive theta and delta closer to zero).
Long side, 2W at the money -0.52 delta puts, 3W (0.5%) out of the money -0.21 delta put and 1M (1%) deep out of the money -0.16 delta put options are recommended. The strategy would be constructed for net debit, narrow expiries are the most essential to ensure the short side expire worthless.

- News

- Economy

- Central Banks
- Investing
- Research
- Roundups
- Digital Currency
- Insights
- Technical Analysis
- Technology
- Business
- Law
- Health
- Nature
- Fintech
- Science
- Topic
- Opinions
- ©Econometrics LLC . All Rights Reserved.
FxWirePro: Use ATM instruments in AUD/JPY PRBS for both hedging and speculation
Wednesday, February 17, 2016 11:51 AM UTC
Editor's Picks


- Market Data
Most Popular


