


 FxWirePro: GBP/AUD gaining momentum for a move towards 1.9150 level
  EUR/USD Relief Rally Crashes Into 200/365 EMA Wall: Sell-on-Rise Near 1.1600 Targets 1.1435
  FxWirePro: GBP/AUD maintains bullish bias with focus on 1.9100
  FxWirePro- Woodies pivot (Major)
  FxWirePro: EUR/AUD bullish outlook with scope to target 1.6550
  FxWirePro- Major European Indices
  AUDJPY Rejected at 113: Triple EMA Bearish Stack and Surging ADX Point to 110.50
  Sterling Surge: GBP/JPY Smashes Above 214 With Triple EMA Blessing; Bulls Eye 217
  FxWirePro: USD/CAD steadies around 1.3920 level , retains bid tonne
  FxWirePro- Major Crypto levels and bias summary
  FxWirePro: USD/CNY holds flat amid concerns over Middle East risks and upcoming U.S. CPI
  FxWirePro: USD/CAD dips as Canadian dollar gains slightly after BoC rate decision
  FxWirePro: GBP/NZD steadies around 2.3060 , retains bid tone
  vFxWirePro: GBP/USD changes short term trend from neutral to bearish
  FxWirePro:USD/JPY holds firm near 160 as intervention fears stay muted
  FxWirePro: USD/ZAR steadies as investors asses Middle East conflict and US CPI figures


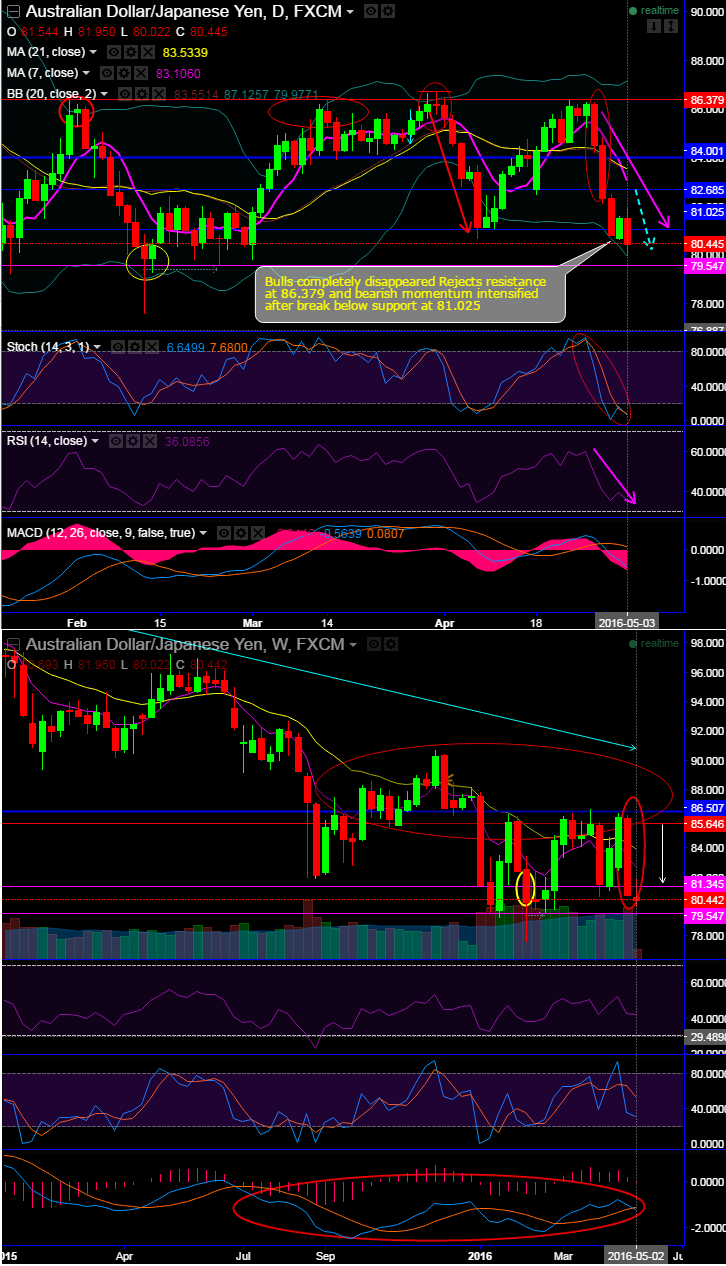
Congratulations to all our readers on this winning trade..!!!, 82.456 as well as 81.025 are very well achieved.
Before we begin, let's just refer below link for our previous write up on the trend prediction:
Still no strength in this pair, more bearish bearish rout on the table as it breaks important support 81.025 as well.
No signs of recovery RSI and Stochastic leading oscillators.
7DMA crosses below 21DMA again, while MACD shows bearish convergence at zeros on daily and remains below zero on weekly.
A resembling bearish engulfing pattern on weekly signifies serious weakness in this pair.
So, how to arrest these bearish risks:
ATM IVs of AUDJPY of 1M tenors is at around 16.81%.
Sensitivity tool signals more positive change in premiums in OTM strikes scenarios.
Thereby, one can initiate trading or hedging strategy using OTM puts which would be even more cheaper.
On hedging grounds, Put ratio Back Spreads are advocated to arrest these downside risks.
Because, the trend signaling bearish risks especially after breaking major supports at 84.001, 82.685 and now 81.025 levels with encouraging bearish signals by technical indicators also as explained in previous technical write up and those stances likely to prolong, and secondly, the traders tend to view the put ratio back spread as a bear strategy, because it employs puts. However, it is actually a volatility strategy.
Options with a higher IV cost more. This is intuitive due to the higher likelihood of the market 'swinging' in your favour. If IV increases and you are holding an option, this is good. You should also note short-dated options are less sensitive to IV, while long-dated are more sensitive.
As we expect the underlying currency exchange rate of AUDJPY to make a larger move on the downside. As shown in the figure purchase 1M 1 lot of at the money -0.49 delta put, 1 lot of 2M (1%) out of the money -0.37 delta put and sell 1W one lot of (0.5%) In-The-Money put option.


