GBPJPY's Fade After the Peak": Pullback From 206.88 Low — Sell Rallies at 208.78-80, Target 207
  FxWirePro: GBP/NZD sustains gains as uptrend remains strong
  AUD/JPY Technical Outlook: Fading the 100-Pip Rally Near 110.25 Resistance
  FxWirePro: USD/JPY rebounds above 157 as dollar firms
  Yield Surge Sinks EUR/USD: Technicals Point to Sell-on-Rallies Near 1.1320
  FxWirePro-USD/CHF Technical Outlook: Buying the Dips Near 0.8320 as Dollar Rally Extends
  FxWirePro: GBP/USD cedes early gains, outlook bearish
  JPY major currency score with the bearish pairs NZDJPY, GBPJPY, AUDJPY, EURJPY, CHFJPY, CADJPY
  NZD/JPY Technical Analysis: Sell-on-Rallies Strategy Eyed Below 90.80 Resistance
  EUR/JPY Technical Outlook: Selling the Rallies Near 178.50 as Euro Momentum Fades
  FxWirePro: GBP/NZD extends gains, eyes 2.3600 level
  FxWirePro: USD/CAD sustains gains as uptrend remains strong
  FxWirePro- Woodies Pivot
  FxWirePro: AUD/USD trades flat, retains downside bias
  FxWirePro: GBP/USD hits three month low, scope for further downside
  Major pair currency score: EURUSD, NZDUSD, AUDUSD extremely bearish, USDCAD, USDCHF bullish


 Add as a preferred source on Google
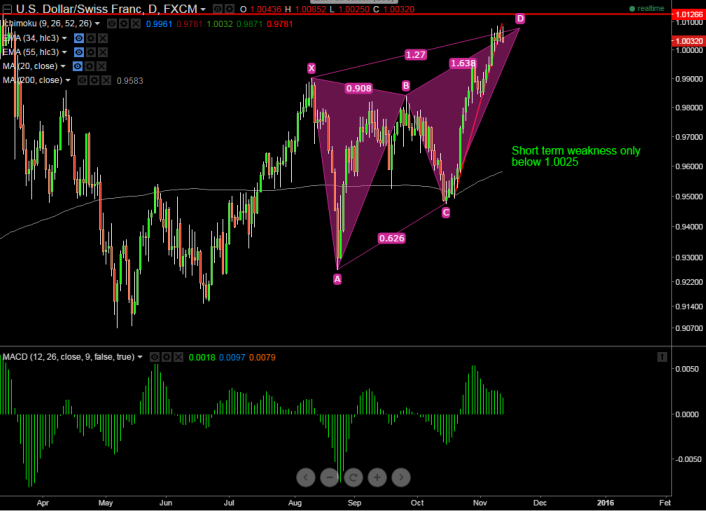
Harmonic Pattern formed- Bearish Butterfly Pattern
Potential Reversal Zone -1.0125.
- The pair has made a high of 1.0085 at the time of writing and started to decline from that level.
- Any break above 1.0125 will take the pair to new level 1.0160/1.0240 in short term.
- On the downside major support is around 1.0025 and break below targets 0.9980/0.9950.
- Overall weakness only below 0.9980 levels.
It is good to sell on rallies around 1.0065-70 with SL around 1.0125 for the TP of 0.9980/0.9950
Resistance
R1-1.0125
R2-1.016
R3- 1.0240
Support
S1- 1.0025
S2-0.9980
S3-0.9950