


 FxWirePro: USD/ZAR fibo rejection triggers sizeable pullback
  FxWirePro- Major Crypto levels and bias summary
  Aussie Retreats Against the Yen: AUDJPY Bears Target 108 as 110 Resistance Holds Firm
  FxWirePro: EUR/ NZD consolidating around 2.0180 room for further gains
  FxWirePro- Major European Indices
  FxWirePro: USD/CNY gains some ground but bearish outlook persists
  FxWirePro- Major Pair levels and bias summary
  EUR/JPY Bulls Charge: Eyeing 186.00 as Euro Strength Intensifies
  FxWirePro: EUR/AUD gaining momentum for a move towards 1.6800 level
  Euro Retreats as Geopolitical Tensions Surge: EURUSD Eyes 1.1400 Floor Amid Safe-Haven Demand
  FxWirePro: USD/JPY firms as Trump's address on Gulf war spark fresh concerns
  FxWirePro: EUR/ NZD steadies around 2.0150, retains bid tone
  Ethereum Retreats Toward USD 2,000: Technicals Signal Caution as ETH Mimics Bitcoin’s Pullback
  Bitcoin Battles Volatility: Institutional Support Eyes USD 64,000 Floor Amid Geopolitical Tensions
  Pound Under Pressure as Yen Stabilizes: GBPJPY Bears Target 208 as Key EMAs Hold Resistance
  FxWirePro- Major Pair levels and bias summary


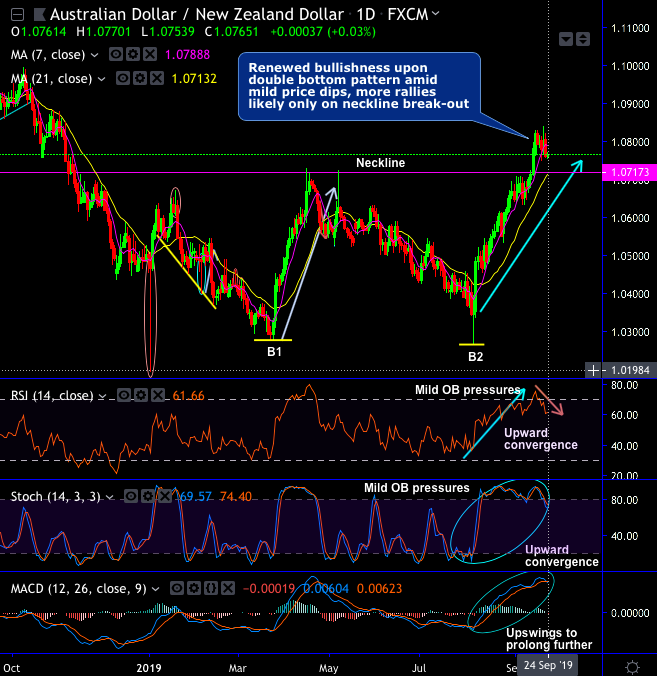
Minor Trend Analysis: The AUDNZD’s minor trend shows bounce back on double bottom formation with bottom 1 at 1.0275, bottom 2 at 1.0264 and neckline at 1.0670 levels (refer daily chart). The pair is hovering at 7DMAs and showing some signs of tiring after a 5c rally since August. More rallies likely upon the break-out above neckline. While both leading and lagging indicators substantiate uptrend on this timeframe.
RSI and stochastic curves show mild overbought pressures though, upward convergence was evidenced to the prevailing bullish rallies that indicate the strength and intensified buying momentum.
Consequently, bulls are attempting to make upside traction with bullish DMA & MACD crossovers in both the minor trend and major consolidation phase.
Major Trend Outlook: On a broader perspective, the fair value according to commodity prices and interest rates remains much higher at 1.13. However, in the near term, markets are focussed on the US-China trade war (negative for the cross) and the RBNZ’s propensity to ease aggressively if needed (positive for the cross). If the trade war at least doesn’t intensify, we’d expect the cross to rise towards 1.0730 – the April peak.
Most importantly, dragonfly doji pattern candles have occurred at 1.0506 and 1.0422 levels on monthly terms, as a result, bulls take-off rallies above EMAs, on the contrary, failure swings were observed at the stiff resistance of 7-EMA levels as shooting star pops-up at 1.0631 levels.
The major consolidation phase that has lasted for more than 5 years is now stuck in the range, both leading oscillators indicate mild strength but not convincing though.
Overall, as stated before in our recent post, consolidation is taken on just above 1.0625 level but the major range-bounded trend remains intact.
Trade tips: Trade one-touch call options: Contemplating prevailing bullish sentiments in the near-terms, bulls are most likely to retest up to 1.0840 levels. Thus, at spot reference: 1.0778 levels, one-touch call option strategy is advocated on the intraday trading basis, using upper strikes at 1.0840 level which is around 60 pips from the current levels.
The trading strategy likely to fetch leveraged yield that would be exponential than spot trades when the forward FX price keeps spiking higher up to upper strikes on the expiration.
Alternatively, on hedging grounds ahead of RBNZ, we advocated initiating longs in AUDNZD futures contracts of September’19 delivery as further upside risks are foreseen and simultaneously, shorts in futures of November’19 delivery for the major downtrend. We now wish to rollover longs for October month.
Thereby, one can directionally position in their FX exposures. The directional implementation of the same trading theme by further allow for a correlation-induced discount in the options trading also if you choose strikes appropriately.


