


 FxWirePro: GBP/NZD up trend gains momentum but hurdles ahead
  NZD/JPY Bear Trap: Triple EMA Ceiling Blocks Relief Rally, Sellers Eye 90.50
  AUD/JPY Dead-Cat Bounce Halted by EMA Wall; Sell-on-Rise Eyes 110.50 Target
  USD/CHF Retreats to Key Trend-Line Wall; Buy-Above-0.8000 Strategy Targets Sharp Rally to 0.8150
  FxWirePro- Major European Indices
  Sterling Surge: GBP/JPY Smashes Above 214 With Triple EMA Blessing; Bulls Eye 217
  Gold Stalls Below $4150 as Hot CPI Fuels Dollar Strength and Safe-Haven Bid Fades
  FxWirePro: AUD/USD eases as middle east peace progress ebbs
  FxWirePro- Woodies pivot (Major)
  FxWirePro: GBP/AUD maintains bullish bias with focus on 1.9100
  NZDJPY Bulls Capped: Triple Bearish EMA Stack Signals Downtrend Path Toward 90
  EUR/USD Relief Rally Crashes Into 200/365 EMA Wall: Sell-on-Rise Near 1.1600 Targets 1.1435
  FxWirePro: AUD/USD firms slightly, but downward resumption looks likely
  FxWirePro USD/JPY consolidates above 160.00 level despite fresh currency intervention threats
  Sterling Surge: GBPJPY Powers Above 214.50 as Triple Bullish EMA Stack Signals Push to 217
  FxWirePro: USD/ZAR steadies as investors asses Middle East conflict and US CPI figures
  FxWirePro:USD/JPY holds firm near 160 as intervention fears stay muted


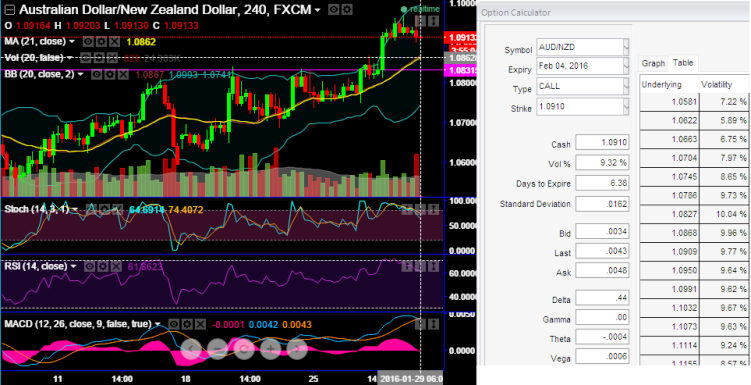
Technical glance:
On 4-hourly chart, RSI bearish crossover at 70s, while %D line crossover at overbought territory intensifies more selling pressures.
We foresee the pair could still drag towards downwards up to 1.0831 levels. At prevailing prices of this APAC pair one can initiate below option strategy as leading oscillators shows downward convergence to the price dips.
Currency Option Strategy:
Anticipating more downside potential, and glance a look at the diagram IVs are lower for prevailing premiums of ATM calls and they are moving in line with healthy delta. We've been steady to hold on this strategy on speculating grounds, unlike spreads, the combinations allow employing both calls and puts at a time in our strategy, thereby you would not miss the swing trading opportunity.
Most importantly, the implied volatility of AUDNZD ATM contracts is at 9.32% which is good sign for option holders. The potential target on upside is about 50-100 pips where 100-130 pips on downside.
The rationale is that any potential downswings should be optimally utilized, so to participate in that downtrend, weights in the portfolio should be doubled with ATM puts.
What makes ATM instrument more productive in our strategy: the delta of this instrument is here at its fastest rate and gets faster as your position come closer to the expiration date. As a result, time decay may have a relevant impact on ATM options.
Hold 1W At-The-Money 0.44 delta call and simultaneously hold 2 lot of 3W At-The-Money -0.49 delta put options. Huge returns attainable with this strategy when AUDNZD exchange rate makes a strong move either upwards or downwards at expiration, with greater gains to be made with a downward move. From the diagram we can understand how the profitability can be maximized for every shift towards downside and this is not the same on upside.
Please be informed that the trader can still make money even if his anticipation goes wrong - but the underlying pair has to move in the opposite direction really fast. The 1 call bought has to beat the cost of buying all the options and still bring in some profits.

- News

- Economy

- Central Banks
- Investing
- Research
- Roundups
- Digital Currency
- Insights
- Technical Analysis
- Technology
- Business
- Law
- Health
- Nature
- Fintech
- Science
- Topic
- Opinions
- ©Econometrics LLC . All Rights Reserved.
FxWirePro: ATM puts in AUD/NZD option strips add leveraging effect in speculation
Friday, January 29, 2016 6:10 AM UTC
Editor's Picks


- Market Data
Most Popular


