


 FxWirePro: USD/CNY dips as yuan firms on improving risk appetite
  FxWirePro- Major Crypto levels and bias summary
  JPY Action Bias: Bullish Pairs to Watch Out For
  FxWirePro- Woodies pivot (Major)
  FxWirePro: GBP/USD downtrend loses steam but outlook still bearish
  GBPJPY Slips After Sterling Weakness, Bears Eye 216
  FxWirePro: USD/CAD positions for another climb, eyes 1.4150 level
  FxWirePro- Major Pair levels and bias summary
  FxWirePro: EUR/NZD up trend gains momentum but hurdles ahead
  FxWirePro: EUR/NZD downside pressure builds, key support level in focus
  FxWirePro: NZD/USD gains as U.S.-Iran peace hopes boost risk sentiment
  NZDJPY Action Bias: Bullish Dip-Buying Opportunity on Broad Yen Weakness
  FxWirePro: GBP/AUD downside pressure builds, key support level in focus
  FxWirePro: USD/ZAR retreats slightly but bias is bullish
  FxWirePro: USD/CAD gaining momentum for a move towards 1.4200 level
  Major Pair Action Bias: Bullish Pairs to Watch Out For


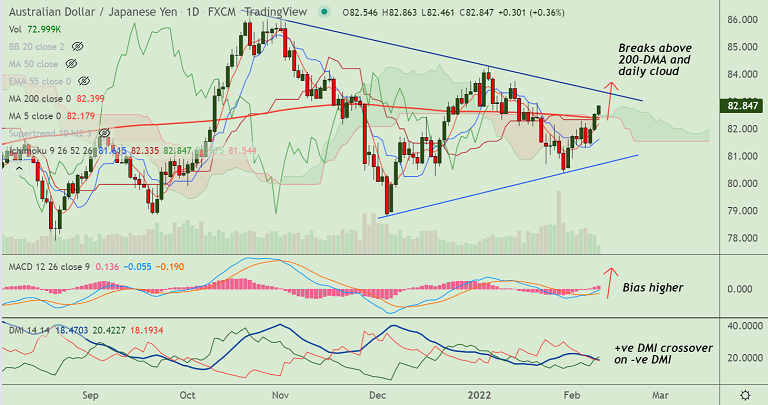
Chart - Courtesy Trading View
AUD/JPY was trading 0.36% higher on the day at 82.84 at around 10:50 GMT.
The pair closed above 200-DMA on Tuesday's trade, raising scope for further upside.
The Australian dollar buoyed on expectations of a hawkish stance from the RBA.
Markets have moved to price in more moves by the RBA, with the first move to 0.25% is implied by June. Further increases to 2.5% are priced in by July 2023.
Yields on Aussie 10-years have surged 25 basis points in four sessions to hit 2.10%, and briefly reached their highest since March 2019 at 2.157%.
Technical indicators show bullish bias. MACD confirms bullish crossover on signal line. GMMA indicator has turned bullish on the intraday charts.
Price action is in a 'Symmetric Triangle' pattern. Scope for test of Triangle top at 83.40. Bullish invalidation likely on retrace below 200-DMA.


