


 JPY Action Bias: USDJPY, EURJPY, and CADJPY Emerge as Top Extremely Bullish Picks
  FxWirePro- Woodies pivot (Major)
  BTC, ETH, SOL, XRP, and BNB: Major Crypto Pairs Stay Neutral
  FxWirePro- Major Pair levels and bias summary
  Major Pairs Action Bias: USDCHF Emerges Extremely Bullish as EURUSD and GBPUSD Turn Deeply Bearish
  FxWirePro: USD/CAD positions for another climb, eyes 1.4150 level
  FxWirePro: AUD/USD gains on Iran-US truce hopes, risk rally
  GBPJPY Slips After Sterling Weakness, Bears Eye 216
  JPY Action Bias: Bullish Pairs to Watch Out For
  FxWirePro- Major Crypto levels and bias summary
  FxWirePro- Major Pair levels and bias summary
  FxWirePro- Woodies pivot (Major)
  AUDJPY Extends Four-Day Rally on Yen Weakness: Bullish Dip-Buy Eyes 117-118
  FxWirePro: USD/CAD gaining momentum for a move towards 1.4200 level
  FxWirePro: GBP/USD downtrend loses steam but outlook still bearish


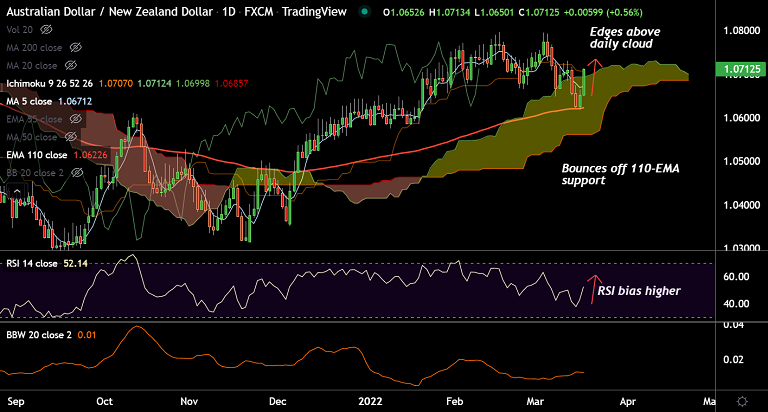
Chart - Courtesy Trading View
AUD/NZD was trading 0.54% higher on the day at 1.0709 at around 11:35 GMT.
The pair has bounced off 110-EMA support and has broken above the daily cloud.
Stochs are on verge of bullish rollover from oversold levels. RSI is above the 50 mark and biased higher.
Price action has broken above 200H MA and the GMMA indicator shows bullish shift in trend on the intraday charts.
The pair has erased most of the losses on the weekly candle and has formed a Dragonfly Doji till date.
5-week MA caps upside in the pair at 1.0716. Break above will see upside resumption. Scope for test of channel top at 1.0815.
Support levels - 1.0693 (Cloud top), 1.0671 (5-DMA), 1.0622 (110-EMA)
Resistance levels - 1.0716 (5-week MA), 1.0767 (Previous week high), 1.0815 (Channel top)
Summary: AUD/NZD poised for upside resumption. Channel top at 1.0815 in sight.


