


 FxWirePro : USD/JPY holds relatively bid on 163 ahead Of FOMC,BoJ meetings
  FxWirePro: NZD/USD edges lower, remains on back foot
  AUDJPY Weakness Deepens: Sell Rallies Toward 112 as Aussie Dollar Falters
  FxWirePro: NZD/USD neutral in the near-term, scope for downward resumption
  Major Forex Pairs Action Bias: GBPUSD and AUDUSD Turn Extremely Bearish
  FxWirePro: GBP/USD edges higher as traders await BoE guidance and UK fiscal clarity
  FxWirePro: EUR/ AUD gains some ground , but remains on bearish path
  FxWirePro: USD/JPY eases ahead of Fed decision , Intervention risks linger
  FxWirePro: GBP/NZD gains some ground but bias is still bearish
  NZDJPY Pullback: Sell Rallies Toward 93.30 as Yen Weakness Eases
  FxWirePro- Major Pair levels and bias summary
  EUR/USD Bounces from Monthly Low, But Bearish Pressure Remains
  Major Pairs Action Bias: USDCAD and USDCHF Stand Out as Extremely Bullish While GBPUSD and NZDUSD Turn Extremely Bearish
  JPY Action Bias: USDJPY Emerges as the Clear Bullish Pair to Watch Amid Mixed Crosses
  FxWirePro: EUR/NZD up trend gains momentum but hurdles ahead


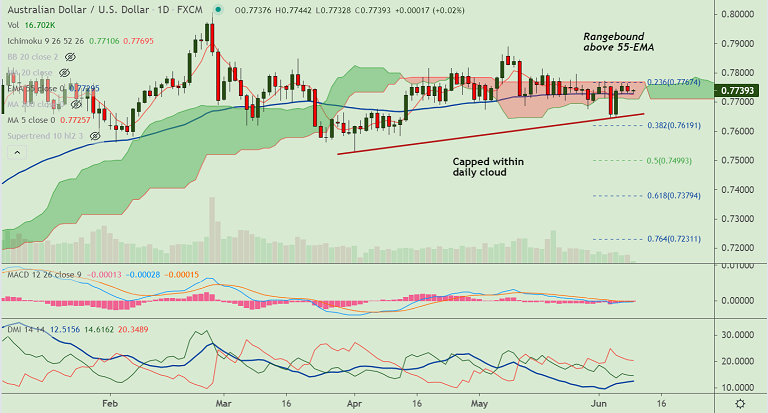
AUD/USD chart - Trading View
AUD/USD was trading largely unchanged on the day at 0.7740 at around 04:40 GMT.
Price action remains capped inside the daily cloud, intraday bias remains neutral.
The Australian dollar remains under pressure on reports that China is mulling price controls on coal prices.
Also, mixed China inflation data has little impact. Data released earlier today showed China’s headline Consumer Price Index (CPI) eased to 1.3% YoY, missing expectations at 1.6%.
On the other side, China Producer Price Index (PPI) jumped the highest since 2008 while marking a 9.0% rally versus 8.5% expected.
Earlier in the day, Australia’s Westpac Consumer Confidence for June dropped below -4.8% previous readouts to -5.2%.
Technical bias for the pair remains neutral. The pair grinds sideways along 200H MA support.
The pair remains capped inside daily cloud. Decisive breakout of cloud will provide a clear directional bias.
Markets trade with a cautious sentiment ahead of the key U.S. data later on Thursday. Focus today on market sentiment for fresh impulse amid a light calendar.


