FxWirePro- Major Pair levels and bias summary
  FxWirePro: GBP/USD cedes early gains, outlook bearish
  Major pair currency score: EURUSD, NZDUSD, AUDUSD extremely bearish, USDCAD, USDCHF bullish
  FxWirePro: BTC/USD Forecast Signals Macro Bull Expansion Toward $200K+ Following 800 EMA Reclaim
  FxWirePro-USD/CHF Technical Outlook: Buying the Dips Near 0.8320 as Dollar Rally Extends
  FxWirePro: GBP/AUD extends gains after stronger UK second-quarter growth
  FxWirePro: GBP/USD hits three month low, scope for further downside
  FxWirePro: USD/JPY rebounds above 157 as dollar firms
  FxWirePro: AUD/USD trades flat, retains downside bias
  FxWirePro- Woodies Pivot
  Yield Surge Sinks EUR/USD: Technicals Point to Sell-on-Rallies Near 1.1320
  FxWirePro: EUR/NZD stuck in a range but outlook is bullish
  GBPJPY's Fade After the Peak": Pullback From 206.88 Low — Sell Rallies at 208.78-80, Target 207
  FxWirePro: EUR/NZD eases slightly but outlook is bullish
  FxWirePro: GBP/NZD extends gains, eyes 2.3600 level


 Add as a preferred source on Google
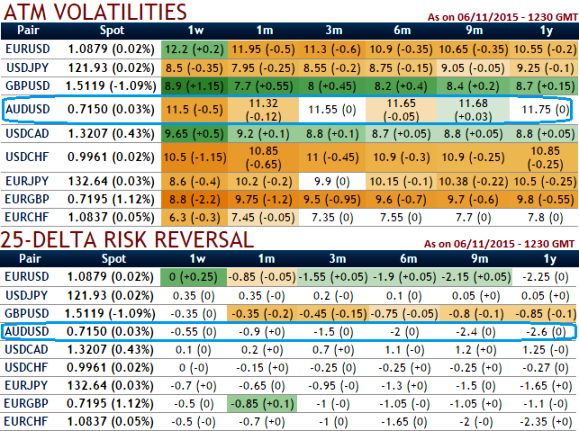
As you can observe from the diagram the implied volatility for near month at the money contracts of this APAC pair has been highest among G20 currency pool after EURUSD and is seen 11.5% for 1w expiry.
While delta risk reversal reveals downside hedging activity has been piling up. As a result we can understand ATM puts have been costlier where the FX market direction of this is heading towards 0.7007 technical levels.
The OTC options market appeared to be more balanced on the direction for the pair over the 1m to 1y time horizon and as a result delta risk reversal for AUDUSD has been maintaining negative which means puts are in higher demand and overpriced comparatively.
Hence, AUDUSD's higher IV with negative delta risk reversal can be interpreted as the market reckons the price has downside potential for large movement which is resulting derivatives instruments for downside risks have been overpriced and fresh shorts are more on the cards.
As shown in the diagram, contemplating the above risk reversal computations, we construct strategy comprising of ATM and OTM puts in the ratio of 2:1 so as to suit the swings on either directions.
As we expect upswings in short term, Capitalizing on higher IV we eye on shorting at the money puts with shorter expiries which would lock in certain yields by initial receipts of premiums.
Simultaneously, 2 lots of ITM -0.50 delta puts are preferred to suit the prevailing losing streaks. So thereby the combination would be executed for net debit and the cost is reduced by short side.

- News

- Economy

- Central Banks
- Investing
- Research
- Roundups
- Digital Currency
- Insights
- Technical Analysis
- Technology
- Business
- Law
- Health
- Nature
- Fintech
- Science
- Topic
- Opinions
- ©Econometrics LLC . All Rights Reserved.
FxWirePro: AUD/USD put writers on upper hand favoured by IV - use rallies to deploy shorts in PRBS
Monday, November 9, 2015 10:38 AM UTC
Editor's Picks



- Market Data
Most Popular