


 FxWirePro: EUR/AUD jumps as payrolls surprise fuels upside
  NZD/JPY Bear Trap: Triple EMA Ceiling Blocks Relief Rally, Sellers Eye 90.50
  FxWirePro- Major Crypto levels and bias summary
  FxWirePro: GBP/USD hovers near three week low, bearish outlook remains
  FxWirePro: AUD/USD holds narrow range, focus on near-term support
  Sterling's Shine Fades: GBPJPY Sell-on-Rally Setup Targets 210.40 Breakdown
  EUR/USD Relief Rally Crashes Into 200/365 EMA Wall: Sell-on-Rise Near 1.1600 Targets 1.1435
  FxWirePro- Major Pair levels and bias summary
  USD/CHF Retreats to Key Trend-Line Wall; Buy-Above-0.8000 Strategy Targets Sharp Rally to 0.8150
  FxWirePro: USD/JPY holds firm despite concerns over possible currency intervention
  FxWirePro: GBP/AUD eases slightly but trend is still bullish
  FxWirePro: USD/CAD bulls continue to hold the higher ground
  FxWirePro: USD/ZAR erases early gains ,looking vulnerable
  FxWirePro- Woodies pivot (Major)
  FxWirePro:GBP/USD recovers some ground but bears are not done yet
  FxWirePro: NZD/USD gains slightly but bearish outlook remains
  FxWirePro- Major European Indices


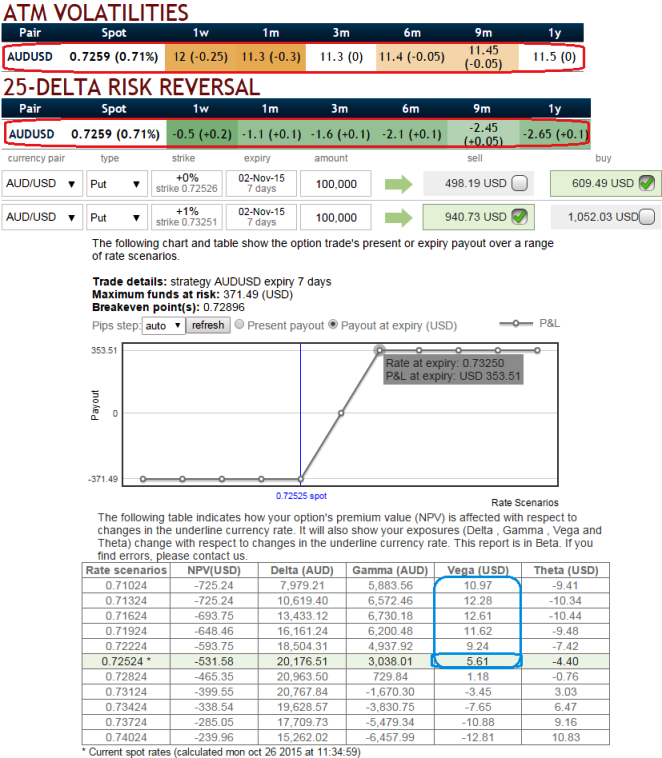
We all know ATM options are more expensive than OTM options, but cheaper than ITM options. They have the highest vega which means their premium is the most sensitive to changes in the underlying market's volatility to move in either direction. As a result, increases the risk and reward for both option buyers and sellers.
Considering the below aspects on speculating perspectives, we recommend deploying one touch binary puts in our strategy in order to extract leverage on extended profitability. But do remember these are exclusively for speculative basis.
Implied volatility of AUDUSD for 1w-1y contracts is at 12%
Delta risk reversal is negative for 1w-1y contracts = -0.5 to -2.65
Last week's Chinese lackluster GDP, IP and fixed asset investment YTD numbers have added negative sentiments to Aussie foreign trades. They flashed at 6.9%, 5.7% and 10.3% respectively which are reduced from previous flashes. Aussie's very close trade exposure to china is hurting consistently.
Whereas on hedging front, by employing 2w At-The-Money vega puts one can multiply returns by twice, thrice or even pour returns exponentially and simultaneously short 1D OTM put on the contrary which gives a cushion for reducing hedging cost by receiving premium.
The prime merits of such one touch option are high yields during high volatility plays. Wider spreads indicates lack of liquidity. The spreads for one touch AUD/USD options are constant time and barrier levels.
Usually, such binary options for every change in 1 pip the relative change in option price 0.01% or even exponential at high implied volatility times. You can see that in charts how every dips would propel Vega effects.

- News

- Economy

- Central Banks
- Investing
- Research
- Roundups
- Digital Currency
- Insights
- Technical Analysis
- Technology
- Business
- Law
- Health
- Nature
- Fintech
- Science
- Topic
- Opinions
- ©Econometrics LLC . All Rights Reserved.
FxWirePro: AUD/USD slumps underway - deploy vega spreads to tackle higher IV
Monday, October 26, 2015 7:59 AM UTC
Editor's Picks


- Market Data
Most Popular


