


 FxWirePro- Major Pair levels and bias summary
  AUDJPY Action Bias: Bullish Dip-Buy Setup Despite Flat Neutral Bias
  JPY Action Bias: Bullish Pairs to Watch Out For
  Major Pair Action Bias: Bullish Pairs to Watch Out For
  FxWirePro: GBP/AUD downside pressure builds, key support level in focus
  Major Pairs Action Bias: USDCAD and USDCHF Stand Out as Extremely Bullish While GBPUSD and NZDUSD Turn Extremely Bearish
  AUDJPY Weakness Deepens: Sell Rallies Toward 112 as Aussie Dollar Falters
  FxWirePro: NZD/USD gains as U.S.-Iran peace hopes boost risk sentiment
  FxWirePro: NZD/USD edges lower, remains on back foot
  FxWirePro: EUR/NZD up trend gains momentum but hurdles ahead
  FxWirePro : USD/JPY holds relatively bid on 163 ahead Of FOMC,BoJ meetings
  FxWirePro: GBP/NZD gains some ground but bias is still bearish
  FxWirePro: USD/CNY dips as yuan firms on improving risk appetite
  FxWirePro- Major Crypto levels and bias summary
  NZDJPY Action Bias: Bullish Dip-Buying Opportunity on Broad Yen Weakness
  JPY Action Bias: USDJPY Emerges as the Clear Bullish Pair to Watch Amid Mixed Crosses
  Crypto Action Bias: ETHUSD Stands Out as the Bullish Pair to Watch


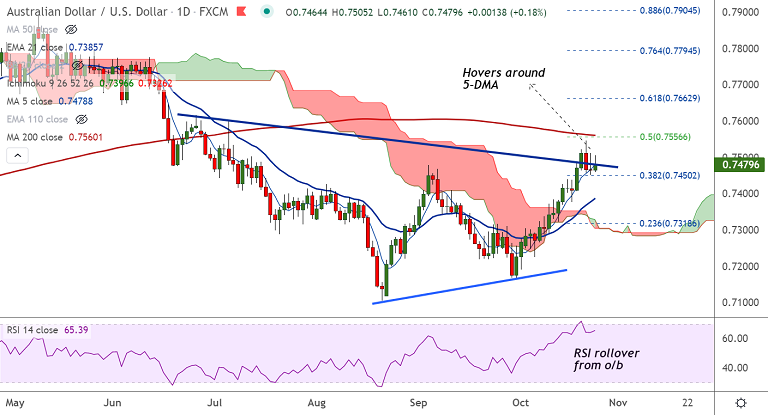
AUD/USD chart - Trading View
AUD/USD has snapped a two-day downside and was trading 0.24% higher on the day at 0.7484 at around 09:30 GMT.
The pair hit session highs at 0.7505 (above 5-DMA at 0.7479) before paring some gains.
Markets remains risk-on amid renewed China optimism, concerning the property sector.
On the other side, the US dollar remains subdued following lower US Treasury yields and ebbing inflation fears.
Bullish bias in the pair intact. Pullbacks seen on account of overbought conditions are likely to be shallow.
Focus remains on the Australian CPI and US GDP this week for further impetus. Upbeat US GDP numbers could provide extra support to the greenback, weighing on the pair.
Major Support Levels:
S1: 0.7450 (38.2% Fib)
S2: 0.7412 (110-EMA)
S3: 0.7386 (21-EMA)
Major Resistance Levels:
R1: 0.75
R2: 0.7543 (Upper BB)
R3: 0.7560 (200-DMA)
Summary: AUD/USD has ignored Gravestone Doji formation on the previous session's candle. Close above 5-DMA will see resumption of upside. Scope for test of 200-DMA at 0.7560.


