


 FxWirePro: GBP/NZD pulls back slightly , bullish bias persists.
  FxWirePro: EUR/AUD bull’s hold the higher ground, remains on bullish path
  FxWirePro: NZD/USD advances as weak U.S. payrolls pressure greenback
  FxWirePro: AUD/USD rallies as traders scale back Fed rate hike bets
  GBPJPY Weakens Amid Yen Strength: Sell on Rallies Recommended
  EURJPY Plunges Below 184 Amidst Yen Strength: Bearish Outlook Persists
  AUDJPY Faces Headwinds: Selling on Rallies Advised as Bearish Trend Emerges
  FxWirePro USD/JPY eases slightly ahead Of US June jobs report
  Gold Surges Above $4100 on Weak US Jobs Data; Bullish Momentum Builds
  FxWirePro- Major Pair levels and bias summary
  FxWirePro: USD/ZAR slips as weak U.S. Jobs data weighs on dollar
  FxWirePro: EUR/USD jumps to eight-session high after weak U.S. jobs data
  FxWirePro: USD/CAD slips on softer US payrolls but near-term direction hinges on 1.4154 support
  FxWirePro: USD/CNY extends drop, faces 23.6%fib support
  FxWirePro- Woodies pivot (Major)
  FxWirePro: USD/CAD steadies around 1.4220 ,retains bid one


The AUD and NZD were firmer against the majors from last week despite soft data outcomes in Australia (wage index and capex outlook), in part because of stronger commodity prices (specifically iron ore).
For the week ahead, we continue to see a choppy trading bias for the AUD - soft Chinese PMI readings are likely to weigh on the currency, but the RBA meeting will likely be neutral, while our stronger-than-consensus Q4 GDP forecast suggests the AUD could jump on a robust print.
Since the RBA kept cash rates on hold at 2.0% and have not provided any signal of imminent rate action, given that there was no significant deterioration in domestic data and the trade-weighted AUD remains almost edgy. On the contrary, CAD's vulnerability likely to resume at any time as the crude oil's strength still seems dubious.
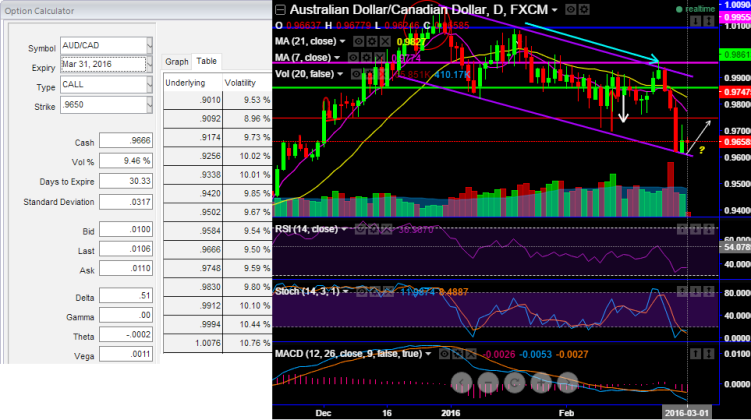
However, technically, the pair has supported at the channel support line at 0.9747, a mild jump above this level should not be surprised.
Currently, even though it looks like the uptrend is likely to resume upon channel line supports, we favor bear trend in intermediary terms as there is no proper confirmation from any other technical indicators.
Hedging Perspectives: Option strips (AUDCAD)
The options strips were deployed anticipating more downside potential, now have a look at the diagram fro prevailing prices of ATM puts and they are moving in line with healthy delta.
Hence, in this perplexing trend analysis, this strategy on hedging grounds, unlike spreads, combinations likely to fetch positive cash flows regardless of swings allow adding both calls and puts at a time in our strategy.
More importantly the implied volatility of AUDCAD 1M ATM contracts is at 9.46% which is mildly on higher side for option holders. The potential target on upside is about 50-100 pips where 110-120 pips on downside.
The rationale is that any potential downswings should be optimally utilized, so to participate in that downtrend, weights in the portfolio should be doubled with ATM puts.
The delta of this instrument is here at its fastest rate and gets faster as your position come closer to the expiration date. As a result, time decay may have a relevant impact on ATM options.
Hold 1M At The Money 0.51 delta call and simultaneously hold 2 lots of 2W At The Money -0.49 delta put options. Huge profits achievable with the strip strategy when AUDCAD exchange rate makes a strong move either upwards or downwards at expiration, with greater gains to be made with a downward move.
Please be informed that the specialty of this strategy is that the trader can still make money even if his anticipation goes wrong - but the underlying pair has to move in the opposite direction really fast. The 1 call bought has to beat the cost of buying all the options and still bring in some profits.

- News

- Economy

- Central Banks
- Investing
- Research
- Roundups
- Digital Currency
- Insights
- Technical Analysis
- Technology
- Business
- Law
- Health
- Nature
- Fintech
- Science
- Topic
- Opinions
- ©Econometrics LLC . All Rights Reserved.
FxWirePro: AUD edgy as RBA stands pat - Place AUD/CAD vertical strips on dubious rallies of channel support
Tuesday, March 1, 2016 6:24 AM UTC
Editor's Picks


- Market Data
Most Popular


7


