FxWirePro: USD/ZAR climbs as firmer dollar pressures rand
  FxWirePro-USD/CHF Technical Outlook: Buying the Dips Near 0.8320 as Dollar Rally Extends
  GBPJPY's Fade After the Peak": Pullback From 206.88 Low — Sell Rallies at 208.78-80, Target 207
  FxWirePro: USD/CAD sustains gains as uptrend remains strong
  FxWirePro: BTC/USD Forecast Signals Macro Bull Expansion Toward $200K+ Following 800 EMA Reclaim
  JPY major currency score with the bearish pairs NZDJPY, GBPJPY, AUDJPY, EURJPY, CHFJPY, CADJPY
  FxWirePro- Woodies Pivot
  FxWirePro: GBP/AUD loses momentum but outlook is bullish
  Yield Surge Sinks EUR/USD: Technicals Point to Sell-on-Rallies Near 1.1320
  FxWirePro- Major Pair levels and bias summary
  Major pair currency score: EURUSD, NZDUSD, AUDUSD extremely bearish, USDCAD, USDCHF bullish
  FxWirePro: GBP/USD hits three month low, scope for further downside
  FxWirePro: EUR/NZD eases slightly but outlook is bullish
  FxWirePro: GBP/AUD extends gains after stronger UK second-quarter growth
  FxWirePro: GBP/NZD sustains gains as uptrend remains strong
  FxWirePro- Major Crypto levels and bias summary
  FxWirePro- Major Crypto levels and bias summary


 Add as a preferred source on Google
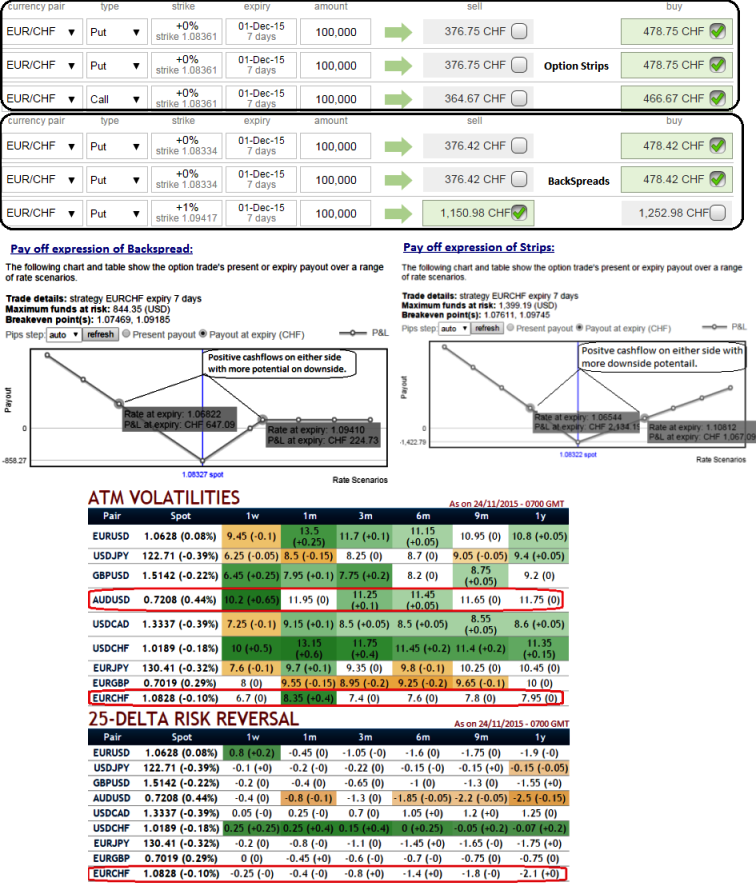
From the nutshell, 25-delta risk of reversals of EUR/CHF the second most expensive pair to be hedged for downside risks after AUDUSD as it indicates puts have been over priced.
Delta risk reversals of EURCHF for next 6 months: The OTC options market appeared to be more balanced on the direction for the pair over the 1m to 1y time horizon and as a result delta risk reversal for EURCHF was turning into negative (sentiments towards downside protection is relatively more expensive).
Comparative Analysis of Option Strips and BackSpreads: EURCHF
With the above risk reversal reasoning, we recommend arresting further downside risks of this pair by Put Ratio back Spread instead of strips which involves extra cost even though both strategies serve similar purpose from 3rd option (short in PRBS & long call in strips).
Strips employs an ATM call along with the puts double the size of call, but in the above explained scenario we think those who so are so bearish in long run but some steep spikes in short run, OTM shorts with very shorter term expiries are recommended (see lower negative risk reversals in the near term which means less bearish in 1 weeks time frame that could be utilized for ATM shorts).
By doing so, one can participate in tiny rallies within 2-3 days time and it also reduces the cost of hedging because of the initial receipt of premiums. Whereas, strips cost extra by deploying an additional call option in this strategy.
So, purchase 1M 2 lots of At-The-Money -0.51 delta puts and sell 3D or 1w one lot of (1%) In-The-Money put option with positive theta.
Hedging cost of option strips = CHF 1424.17 (at net debit).
Hedging cost of backspreads = - CHF 194.14 (at net credit).
As shown in the diagram, use shorter expiries (2D or 3D) for OTM put writing that funds CHF 189.78 to the purchase of the greater number of long puts and the position is entered for no cost or reduced cost.

- News

- Economy

- Central Banks
- Investing
- Research
- Roundups
- Digital Currency
- Insights
- Technical Analysis
- Technology
- Business
- Law
- Health
- Nature
- Fintech
- Science
- Topic
- Opinions
- ©Econometrics LLC . All Rights Reserved.
FxWirePro: Aggressive bears preferring EUR/CHF backspreads i/o option strips to reduce hedging cost
Tuesday, November 24, 2015 1:58 PM UTC
Editor's Picks



- Market Data
Most Popular