FxWirePro- Major Crypto levels and bias summary
  FxWirePro: AUD/USD pressured by rising treasury yields, risk-off mood
  USD/CHF Bulls Eye 0.8400 Breakout as Broad Dollar Demand Drives 100-Pip Surge
  AUDJPY Tumbles Below 111 on Widespread Australian Dollar Weakness; Key Resistance at 112 Holds Firm
  FxWirePro: GBP/NZD steadies around 2.3350 , retains bid tone
  FxWirePro: GBP/AUD firms slightly, but downward resumption looks likely
  FxWirePro: EUR/AUD retreat from early gains, eyes another drop
  FxWirePro: USD/JPY loses momentum but outlook is bullish
  Fade the Rally: EUR/JPY Short Opportunity Near 180.80
  GBP/JPY Pullback Deepens: Sell-on-Rallies Strategy Targets 207.00 Support
  FxWirePro- Major Pair levels and bias summary
  FxWirePro: GBP/USD gains some ground but bulls lack punch
  FxWirePro: USD/CAD hits two month high as Canadian as retail sales post monthly decline
  Sell the Rally: Gold Eyeing $4,000 as Dollar Strength Takes Control
  FxWirePro: EUR/AUD firms slightly, but outlook remains bearish
  Extremely Bearish JPY Majors: GBPJPY, NZDJPY, AUDJPY Lead the Decline
  ETHUSD Surges Past $2700 on Strong Institutional Demand, Technicals Show Bullish Crossover Despite Cooling ETF Inflow Momentum


 Add as a preferred source on Google
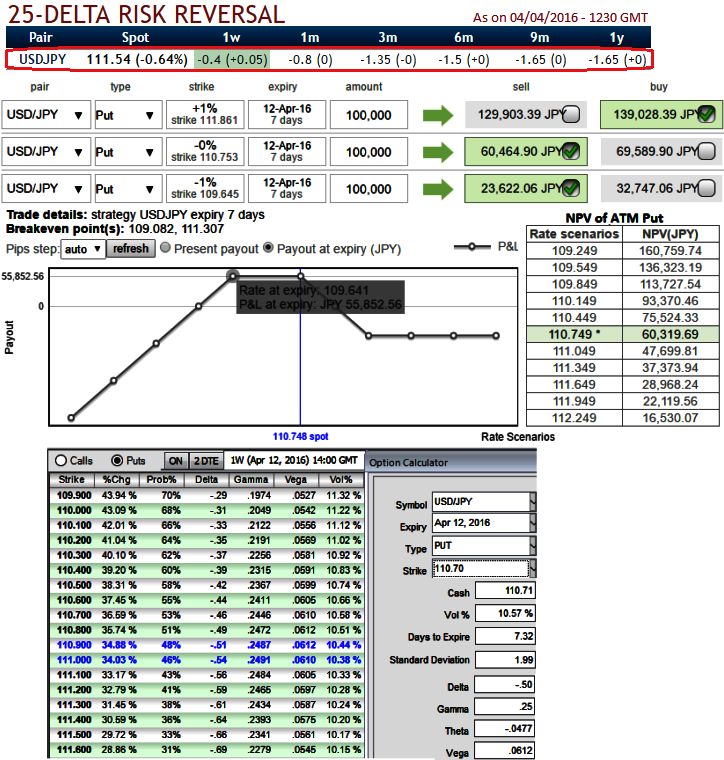
Why do we think USDJPY sensing pressures for downside risks but hedging costs seem expensive:
As we could see little change in delta risk reversal numbers, that signals underlying pair may show slight strength in next 1 weeks time but it doesn't mean that it would show a bullish trend reversal.
So, idea is that any upswings in abrupt would be optimally utilized for shorts in any strategy to hedge further downside risks.
Please be noted that the 1W ATM put contracts are trading 15% more than NPV, whereas ATM IVs of the same tenors (1W) is just shy below 11% (10.57% to precise while articulating).
These shorts would be deployed so as to reduce the total hedging costs.
Technically, Break-out below major supports at 111 levels (lower BB, Avrg. of recent lows) signals more scope for downside to targets upto 109.698 or 108.029 levels. RSI and Stochastic oscillators on both daily and weekly graphs are indicative of further declines.
This strategy is advisable that is employed as the OTC market reckons that the underlying USDJPY pair would experience little volatility in the near term (see for 1W ATM IVs).
FX Option Strategy: Put Ladder (USD/JPY)
Let's run through how to execute this option strategy:
Stay short in 1W ATM put since implied volatility is not expected to be higher (below 11%) when risk reversals are lesser comparatively to 1M expiries which is good for option writers in next 1 week, and short another 1W (1%) OTM put with positive thetas, simultaneously go long in 2W (1%) ITM -0.67 delta put option.
The reason for shorting an extra put is to further finance the cost of establishing the spread position at the expense of being exposed to unlimited risk in the event that the underlying spot FX price crashes.