


 FxWirePro: AUD/USD firms slightly, but downward resumption looks likely
  FxWirePro: AUD/USD eases as middle east peace progress ebbs
  AUD/JPY Dead-Cat Bounce Halted by EMA Wall; Sell-on-Rise Eyes 110.50 Target
  FxWirePro- Major Pair levels and bias summary
  Gold Stalls Below $4150 as Hot CPI Fuels Dollar Strength and Safe-Haven Bid Fades
  USD/CHF Retreats to Key Trend-Line Wall; Buy-Above-0.8000 Strategy Targets Sharp Rally to 0.8150
  FxWirePro:GBP/USD recovers some ground but bears are not done yet
  FxWirePro:USD/JPY holds firm near 160 as intervention fears stay muted
  FxWirePro: EUR/ NZD consolidating around 1.9855, room for further gains
  AUDJPY Rejected at 113: Triple EMA Bearish Stack and Surging ADX Point to 110.50
  FxWirePro- Major Crypto levels and bias summary
  FxWirePro: USD/CNY holds flat amid concerns over Middle East risks and upcoming U.S. CPI
  FxWirePro: NZD/USD under pressure amid US-Iran deterioration
  Sterling Surge: GBP/JPY Smashes Above 214 With Triple EMA Blessing; Bulls Eye 217
  Sterling Surge: GBPJPY Powers Above 214.50 as Triple Bullish EMA Stack Signals Push to 217


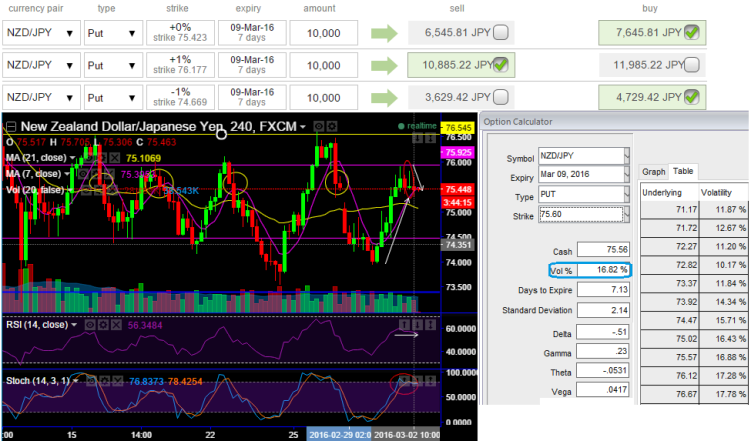
Although we've been observing some bounces, long term bearish trend seems intact we could see with a dubious eyes on Kiwi fundamentals which are not so conducive and while short term upswings in abrupt should not be scary but instead utilize them in below strategy.
Hedging strategy: Short Put Ladder:
Short 4D (1%) NZDJPY ITM put with positive theta.
Long in 2W NZDJPY ATM -0.51 delta put.
Long 1M NZDJPY (1%) OTM -0.31 delta put.
This strategy is to deployed when the you think that NZDJPY will experience significant volatility in the near term.
Some price recoveries from last couple of days could be utilized by employing short term put writings and derives certain returns.
With current spot FX at 75.378 levels and the implied volatility of 1W contracts are flashing at 16.82%, the strategy takes care of long term basis hedging motives, and any upswing is likely to favour these short side of 1% ITM put option with shorter expiry as the stiff resistances are seen at 75.925 and 76.545 levels and it has rejected at this level several times in the recent past.
So the predictions are that it may either hold this level or drag slightly further above in near term but certainly not beyond, this would benefit shorts.
Thereafter the functionality of active longs on 2W ATM -0.50 delta put option and one more long position on 1M (-1%) OTM -0.31 delta put option would prove to be hedging materials.
When the pair goes upwards (strongly or moderately), remains stagnant or goes downwards strongly. Indeed, the Short Put Ladder Spread has made profitable 4 out of 5 possible outcomes which make its probability of profit extremely high.
What does it do with current trend: Since the short put ladder is an unrestricted return with partial risk bearing strategy that is deployed because in addition to the puzzling uptrend in short term and downtrend in long-term, we think that the NZDJPY would also perceive significant volatility in the near term.
Maximum returns are limited to the extent of initial credit received if the NZDJPY rallies above the upper breakeven point (BEP) but large unlimited profit can be achieved should the underlying exchange rate of NZDJPY makes a vivid downswings below the lower BEP.
Please be noted that the expiries used in the diagram are only for demonstrated purpose, appropriate tenors are to be preferred as stated above.

- News

- Economy

- Central Banks
- Investing
- Research
- Roundups
- Digital Currency
- Insights
- Technical Analysis
- Technology
- Business
- Law
- Health
- Nature
- Fintech
- Science
- Topic
- Opinions
- ©Econometrics LLC . All Rights Reserved.
FxWirePro: Capitalize on higher NZD/JPY IVS and rallies to deploy shorts in put ladder for hedging
Wednesday, March 2, 2016 2:20 PM UTC
Editor's Picks


- Market Data
Most Popular


