


 AUDJPY Cracks Below 113: Bearish Breakdown Accelerates Toward 110.50 Target
  FxWirePro:GBP/USD recovers some ground but bears are not done yet
  EURJPY Bearish Dent Intact: Sell the Relief Rally Toward 183/182 Support
  AUD/JPY Dead-Cat Bounce Halted by EMA Wall; Sell-on-Rise Eyes 110.50 Target
  FxWirePro: AUD/USD holds narrow range, focus on near-term support
  NZD/JPY Bear Trap: Triple EMA Ceiling Blocks Relief Rally, Sellers Eye 90.50
  FxWirePro- Major Pair levels and bias summary
  FxWirePro: USD/CAD bulls continue to hold the higher ground
  FxWirePro: AUD/USD firms slightly, but downward resumption looks likely
  FxWirePro- Major Crypto levels and bias summary
  FxWirePro- Woodies pivot (Major)
  NZDJPY Bearish Reversal Intact: Triple EMA Stack Signals Sell-on-Rallies Play Toward 90.50
  FxWirePro: EUR/ NZD consolidating around 1.9855, room for further gains
  FxWirePro- Major Crypto levels and bias summary
  FxWirePro- Major European Indices
  FxWirePro: USD/ZAR erases early gains ,looking vulnerable
  EUR/USD Relief Rally Crashes Into 200/365 EMA Wall: Sell-on-Rise Near 1.1600 Targets 1.1435


This pair has been in extremely bullish mood, it is now making every attempts of recovery as both technical and fundamental indications are signaling buying sentiments, we've run through the bullish indications based on technical reasoning in our last post.
Please refer below link for further technical readings:
http://www.econotimes.com/FxWirePro-AUD-JPY-long-entry-triggered-after-clear-confirmation-of-break-out-of-apex-point-117367
http://www.econotimes.com/FxWirePro-AUD-JPY-sustains-bullish-break-out-of-apex-spot-heading-towards-big-targets-at-89297-and-90370-120438
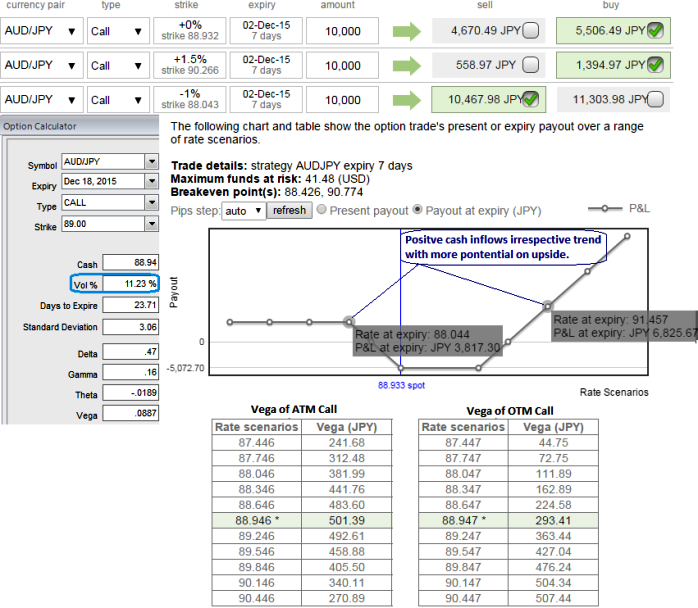
Vega on Long ATM Call = 501.39
Vega on Long (1.5%) OTM Call = 293.41
The current IV of AUDJPY ATM call is higher side at 11.23% which is good for holders and current spot FX is ticking at 88.932, usually if the Vega of a long option position is positive and the implied volatility rises or dips, the above stated option prices are directly proportional to the implied volatility.
So in this case Vega both on long position is reasonably acceptable. It is desirable that at maturity the underlying exchange rate of AUDJPY to remain near short strikes in order to achieve highest returns.
Hence, we recommend it is better to cover all your shorts and employ Call Ratio Back Spread as shown in the diagram purchase 1 lot of 1w at the money +0.51 delta calls and 1w 1 lot of (1.5%) OTM 0.15 delta call, simultaneously short 1 lot of 3d (1%) in the money call with positive theta in the ratio of 2:1.
The purpose of a back spread is to profit on a quick extended move toward, through and beyond the long strike. The purchase of a quantity of more long options is financed by the sale of fewer short options.
The lower strike short calls because IV is inching lower at 11.23% (this is good news for option holders) and it finances the purchase of the greater number of long calls (ATM calls are overpriced, so we chose 1.5% OTM calls as well) and the position is entered for net credit.

- News

- Economy

- Central Banks
- Investing
- Research
- Roundups
- Digital Currency
- Insights
- Technical Analysis
- Technology
- Business
- Law
- Health
- Nature
- Fintech
- Science
- Topic
- Opinions
- ©Econometrics LLC . All Rights Reserved.
FxWirePro: Deploy CRBS on AUD/JPY HY vols
Wednesday, November 25, 2015 7:21 AM UTC
Editor's Picks


- Market Data
Most Popular


