


 FxWirePro- Major Pair levels and bias summary
  FxWirePro: GBP/NZD edges lower but bias is bullish
  EURJPY Bearish Dent Intact: Sell the Relief Rally Toward 183/182 Support
  FxWirePro: EUR/ NZD consolidating around 1.9855, room for further gains
  FxWirePro: AUD/USD holds narrow range, focus on near-term support
  FxWirePro USD/JPY consolidates above 160.00 level despite fresh currency intervention threats
  FxWirePro: AUD/USD firms slightly, but downward resumption looks likely
  FxWirePro: EUR/AUD jumps as payrolls surprise fuels upside
  AUDJPY Cracks Below 113: Bearish Breakdown Accelerates Toward 110.50 Target
  FxWirePro: USD/JPY holds firm despite concerns over possible currency intervention
  Sterling's Shine Fades: GBPJPY Sell-on-Rally Setup Targets 210.40 Breakdown
  NZD/JPY Bear Trap: Triple EMA Ceiling Blocks Relief Rally, Sellers Eye 90.50
  FxWirePro: USD/CAD bulls continue to hold the higher ground
  AUD/JPY Dead-Cat Bounce Halted by EMA Wall; Sell-on-Rise Eyes 110.50 Target
  FxWirePro- Woodies pivot (Major)
  FxWirePro- Major Crypto levels and bias summary
  FxWirePro: GBP/AUD eases slightly but trend is still bullish


We would urge you to go through below link in order to proceed with our hedging strategy:
http://www.econotimes.com/FxWirePro-AUD-JPY-ATM-IV-still-favors-put-writers-%E2%80%93-31-PRBS-to-extract-max-leverage-109821
What's cooking with AUD fundamentals: It still seemed clear in the RBA's last statement that it would not cut rates again today's labour market report for September questions this impression.
The only reason why the loss of almost 14k full time positions did not lead to a rise in the unemployment rate was that the participation rate eased.
The RBA is not yet out of the woods. In particular as long as China is struggling, a further rate cut is possible.
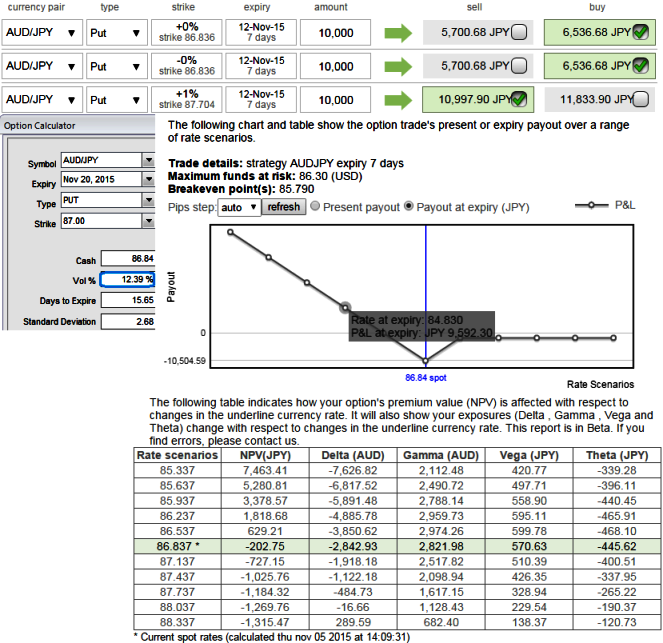
Higher Implied Volatility and Put Ratio Back Spread: AUD/JPY
The implied volatility of ATM AUDJPY puts of near month contract has reduced from 14% to 12.39% that is good sign for option holders (as a result reduced weights in backspreads after benefitting from 3:2 ratios).
We know that the options with a higher IV cost more, intuitively due to the higher likelihood of the market 'swinging' in your favour.
If IV increases and you are holding an option, this is good. You should also note short-dated options are less sensitive to IV, while long-dated are more sensitive.
Traders tend to view the put ratio back spread as a bear strategy, because it employs puts. However, it is actually a volatility strategy. The implied volatility of 1M ATM put contract is at 12% and it is quite higher side which is good sign for option writers.
As we expect the underlying currency exchange rate of AUDJPY to make a larger move on the downside. As shown in the figure purchase 1M 2 lots of At-The-Money -0.52 delta puts and sell 1W one lot of (1%) In-The-Money put option.
Entering into the above recommended AUDJPY positions when implied volatility ticks at around 12% and expecting for the inevitable adjustment is a smart approach, regardless of the direction of price movement. Based on volatility and time decay, the strategy is a "price neutral" approach to options, and one that makes a lot of sense.

- News

- Economy

- Central Banks
- Investing
- Research
- Roundups
- Digital Currency
- Insights
- Technical Analysis
- Technology
- Business
- Law
- Health
- Nature
- Fintech
- Science
- Topic
- Opinions
- ©Econometrics LLC . All Rights Reserved.
FxWirePro: Reduced IV favors AUD/JPY put holders, 2:1 backspreads to reduce hedging cost
Thursday, November 5, 2015 8:46 AM UTC
Editor's Picks


- Market Data
Most Popular


