


 FxWirePro: USD/CAD steadies around 1.3920 level , retains bid tonne
  AUDJPY Rejected at 113: Triple EMA Bearish Stack and Surging ADX Point to 110.50
  FxWirePro:USD/JPY holds firm near 160 as intervention fears stay muted
  NZDJPY Bulls Capped: Triple Bearish EMA Stack Signals Downtrend Path Toward 90
  FxWirePro: GBP/NZD up trend gains momentum but hurdles ahead
  FxWirePro: EUR/ NZD sustains gains as uptrend remains strong
  FxWirePro: USD/CAD dips as Canadian dollar gains slightly after BoC rate decision
  FxWirePro- Major Crypto levels and bias summary
  FxWirePro- Major Crypto levels and bias summary
  FxWirePro: EUR/AUD bullish outlook with scope to target 1.6550
  Sterling Surge: GBP/JPY Smashes Above 214 With Triple EMA Blessing; Bulls Eye 217
  USD/CHF Retreats to Key Trend-Line Wall; Buy-Above-0.8000 Strategy Targets Sharp Rally to 0.8150
  Sterling Surge: GBPJPY Powers Above 214.50 as Triple Bullish EMA Stack Signals Push to 217
  FxWirePro: AUD/USD eases as middle east peace progress ebbs
  EUR/USD Relief Rally Crashes Into 200/365 EMA Wall: Sell-on-Rise Near 1.1600 Targets 1.1435
  FxWirePro- Major Pair levels and bias summary


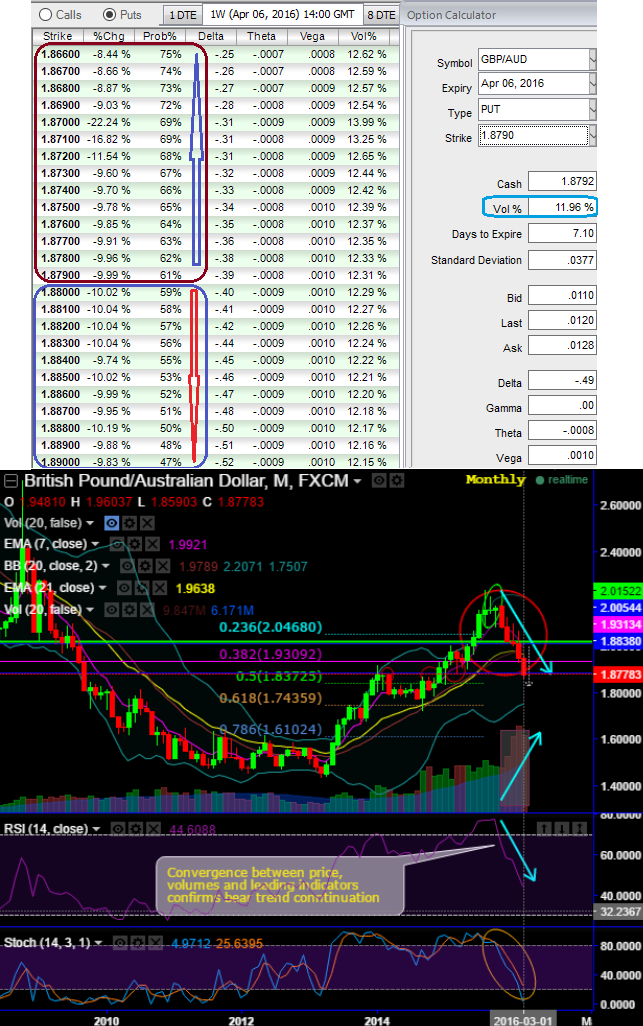
ATM IVs of 1W expiries are almost shy below 12%, and 11.70% for 1M tenor.
With the momentum in long term bear trend being intensified, technically the pair has broken crucial supports,
If you have to evaluate the ATM IVs with the monthly technical chart, the prevailing bearish swings have convincingly shown their effects.
Aussie dollar against sterling has been gaining consistently (so far 3.48% in this month while articulating) as both all technical and fundamental environments are still signalling selling sentiments in GBPAUD.
If IV is high, it means the market thinks the price has potential for large movement trend direction. In GBPAUD case, as you can probably guess where would spot FX head towards considering the IVs and technical indications shown in the diagram.
As IV increases along with the anticipated direction in trend (which is happening in GBPAUD case) and if you are holding a put option, that's conducive for put option holder.
Because your options with a higher IV cost more which means more positive cash inflow is likley.
Sensitivity tool: In addition to that, as shown in the diagram, if you have to optimise these favourable vols, consider the premiums with probabilistic numbers in distinctive scenarios of OTM strikes.
(At spot FX 1.8796, as it travels towards OTM strikes (see through OTM strikes and their probability numbers), this means more chances of expiring in the money and huge changes in premiums, so these options pricing seems reasonable, but same is not the case with lower strikes.
Hence, the OTM options pricing seems reasonable in bearish hedging strategies, which means more likelihood of these puts expiring in the money.
Hence, we recommend initiating longs in 1M (1%) OTM -0.37 delta put, 1 lot of 2W ATM -0.49 delta put and simultaneously short 1 lot of 1W (1%) ITM put in the ratio of 2:1.
The upper strike short puts finance the purchase of the greater number of long calls and the position is entered for reduced cost.


