


 FxWirePro: USD/CAD bulls continue to hold the higher ground
  FxWirePro: GBP/AUD eases slightly but trend is still bullish
  FxWirePro: GBP/NZD up trend gains momentum but hurdles ahead
  NZD/JPY Bear Trap: Triple EMA Ceiling Blocks Relief Rally, Sellers Eye 90.50
  EUR/USD Relief Rally Crashes Into 200/365 EMA Wall: Sell-on-Rise Near 1.1600 Targets 1.1435
  FxWirePro: USD/CAD steadies around 1.3920 level , retains bid tonne
  FxWirePro: NZD/USD gains slightly but bearish outlook remains
  FxWirePro: EUR/ NZD consolidating around 1.9855, room for further gains
  Sterling Surge: GBP/JPY Smashes Above 214 With Triple EMA Blessing; Bulls Eye 217
  AUDJPY Cracks Below 113: Bearish Breakdown Accelerates Toward 110.50 Target
  EURJPY Bearish Dent Intact: Sell the Relief Rally Toward 183/182 Support
  FxWirePro- Major European Indices
  FxWirePro: USD/ZAR erases early gains ,looking vulnerable
  FxWirePro- Woodies pivot (Major)
  Sterling's Shine Fades: GBPJPY Sell-on-Rally Setup Targets 210.40 Breakdown
  FxWirePro: USD/JPY holds firm despite concerns over possible currency intervention


We see the AUD biased lower over the next 3-6 months on the back of modest near term softness in commodity prices and Fed tightening (1Q16 target ), before finding some support later in the year (4Q16 target ) as the terms of trade trough and the domestic economy continues to rotate away from mining-related activity.
We think AUD/NZD remains in a broad 1.05-1.15 range, but that risks are biased towards a move towards the top of the range by mid-2016. We expect that rate differentials and relative commodity price performance will be supportive for the cross in the year ahead.
Currency Option Strategy:
Antipodean vols are likely to lift modestly (3M ATMs around +1point) in 1H16. Own gamma heading into the Fed cycle and sell risk-reversals preferentially on spikes.
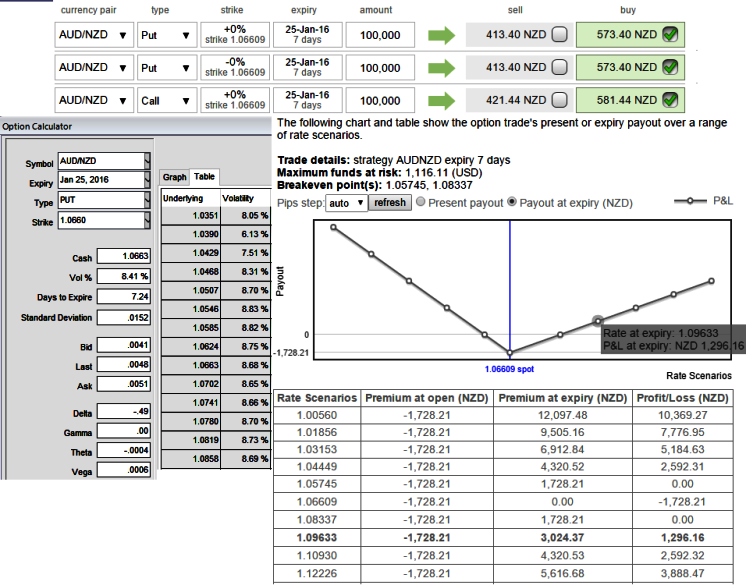
The options strips were deployed anticipating more downside potential, now have a look at the diagram from prevailing prices of ATM puts and they are moving in line with healthy delta.
More importantly the implied volatility of AUDNZD ATM contracts inching lower at 9.24% which is good sign for option holders. The potential target on upside is about 50-100 pips where 100-130 pips on downside.
The rationale is that any potential downswings should be optimally utilized, so to participate in that downtrend, weights in the portfolio should be doubled with ATM puts.
The delta of this instrument is here at its fastest rate and gets faster as your position come closer to the expiration date, as a result, time decay may have a relevant impact on ATM options. This would make the strategy more productive to achieve desired objectives of the position.
So go long in 15D At-The-Money 0.50 delta call and simultaneously hold 2 lots of 1M At-The-Money -0.48 delta put options.
Huge profits achievable with the strip strategy when AUDNZD exchange rate makes a strong move either upwards or downwards at expiration, with greater gains to be made with a downward move. From the diagram we can understand how the profitability can be maximized for every shift towards downside and this is not the same on upside.
Please be informed that the trader can still make money even if his anticipation goes wrong - but the underlying pair has to move in the opposite direction really fast. The 1 call bought has to beat the cost of buying all the options and still bring in some profits.

- News

- Economy

- Central Banks
- Investing
- Research
- Roundups
- Digital Currency
- Insights
- Technical Analysis
- Technology
- Business
- Law
- Health
- Nature
- Fintech
- Science
- Topic
- Opinions
- ©Econometrics LLC . All Rights Reserved.
FxWirePro: Leveraging AUD/NZD’s downtrend - append straddles with extra ATM delta put on low IVs
Monday, January 18, 2016 12:33 PM UTC
Editor's Picks


- Market Data
Most Popular


