FxWirePro- Woodies Pivot
  FxWirePro: GBP/NZD positions for another climb, eyes 2.3700 level
  FxWirePro: GBP/USD retreats as Bailey warns of prolonged inflation risks
  FxWirePro: USD/CAD edges lower but outlook is still bullish
  FxWirePro: NZD/USD bearish bias intact, eyes 0.5500 level
  JPY Major Currency Score: Mixed Trend — USDJPY Bullish; NZDJPY, AUDJPY, GBPJPY and EURJPY Bearish
  FxWirePro: GBP/USD slips as dollar strengthens ahead of Fed minutes
  FxWirePro: GBP/AUD edges lower ,scope for further downside
  FxWirePro: AUD/USD edges lower as risk sentiment deteriorates
  FxWirePro: EUR/AUD gains some ground but outlook is bearish
  FxWirePro: USD/ZAR holds above 16.600, maintains bullish bias
  FxWirePro- Major Pair levels and bias summary
  FxWirePro- Woodies Pivot
  FxWirePro- Major Crypto levels and bias summary
  FxWirePro: EUR/NZD recovers from early dip, upside pressure builds
  FxWirePro: NZD/USD rebounds modestly but outlook is still bearish


 Add as a preferred source on Google
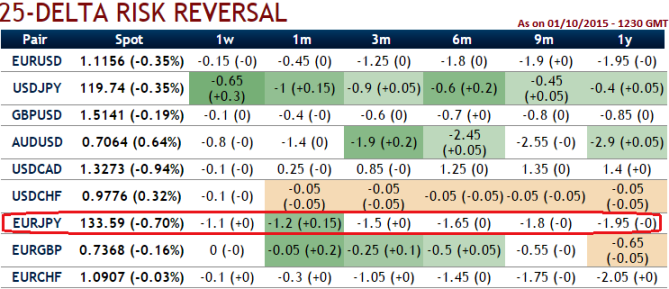
The current spot FX is trading at 134.114, we expect dips extending up to 132.522 levels in near terms. It is understood that bearish momentum is bolstering as we saw that from delta risk reversal table and technical indications. Hence, aggressive bears can initiate one more ATM put in order to make their existing bear put spread that was recommended last week into put backspread.
Unlike a simple naked put, put backspreads have an extra long that have leveraging effects and a short option at a lower strike that caps your reward but also reduces the net cost of the trade. So, the recommendation for now is to add an extra long on put with 1W expiry to the existing debit put spreads.
Please observe how delta risk reversal numbers are getting higher negative values gradually in a long run (it has almost touched -2 for 1 year expiry). Volatility smiles most frequently show that traders are willing to pay higher implied volatility prices as the strike price grows aggressively out of the money.
The challenge now is determining which strikes you should use in this strategy. The broader the strike difference between short and long puts, the fewer puts you need to sell to cover the price of the long puts. But at the same time, the coverage of long-to-short is going to be more difficult in the event of assignment.
With these narrow strike differences, the profit potential is greater, so that the ratio needed is also lower to profit on underlying movement. You want to take this trade if you think this pair can go lower, but not crash below 132.265 (the OTM shorts). Caution: If you think the pair is going to crash, you should be loading up on put buys in existing strategy. The total cost of the trade is going to be the difference between the prices of the two options.
Since the option you sell will always be lower on the skew curve it means you are getting a better deal on what you are selling compared to what you are buying. It makes this strategy a good one if the skew is running a little hot but EURJPY hasn't rolled over that much.

- News

- Economy

- Central Banks
- Investing
- Research
- Roundups
- Digital Currency
- Insights
- Technical Analysis
- Technology
- Business
- Law
- Health
- Nature
- Fintech
- Science
- Topic
- Opinions
- ©Econometrics LLC . All Rights Reserved.
FxWirePro: Mitigate downside risks of EUR/JPY with PRBS as delta risk reversal suggests costlier bearish hedging
Friday, October 2, 2015 6:16 AM UTC
Editor's Picks



- Market Data
Most Popular