


 FxWirePro- Major Crypto levels and bias summary
  FxWirePro:USD/JPY holds firm near 160 as intervention fears stay muted
  NZDJPY Bulls Capped: Triple Bearish EMA Stack Signals Downtrend Path Toward 90
  FxWirePro:GBP/USD recovers some ground but bears are not done yet
  FxWirePro- Major European Indices
  FxWirePro USD/JPY consolidates above 160.00 level despite fresh currency intervention threats
  FxWirePro: USD/CNY holds flat amid concerns over Middle East risks and upcoming U.S. CPI
  FxWirePro: GBP/AUD maintains bullish bias with focus on 1.9100
  Gold Stalls Below $4150 as Hot CPI Fuels Dollar Strength and Safe-Haven Bid Fades
  FxWirePro: NZD/USD gains slightly but bearish outlook remains
  AUD/JPY Dead-Cat Bounce Halted by EMA Wall; Sell-on-Rise Eyes 110.50 Target
  FxWirePro: AUD/USD eases as middle east peace progress ebbs
  Sterling Surge: GBP/JPY Smashes Above 214 With Triple EMA Blessing; Bulls Eye 217
  AUDJPY Rejected at 113: Triple EMA Bearish Stack and Surging ADX Point to 110.50
  FxWirePro- Woodies pivot (Major)
  FxWirePro: USD/ZAR steadies as investors asses Middle East conflict and US CPI figures


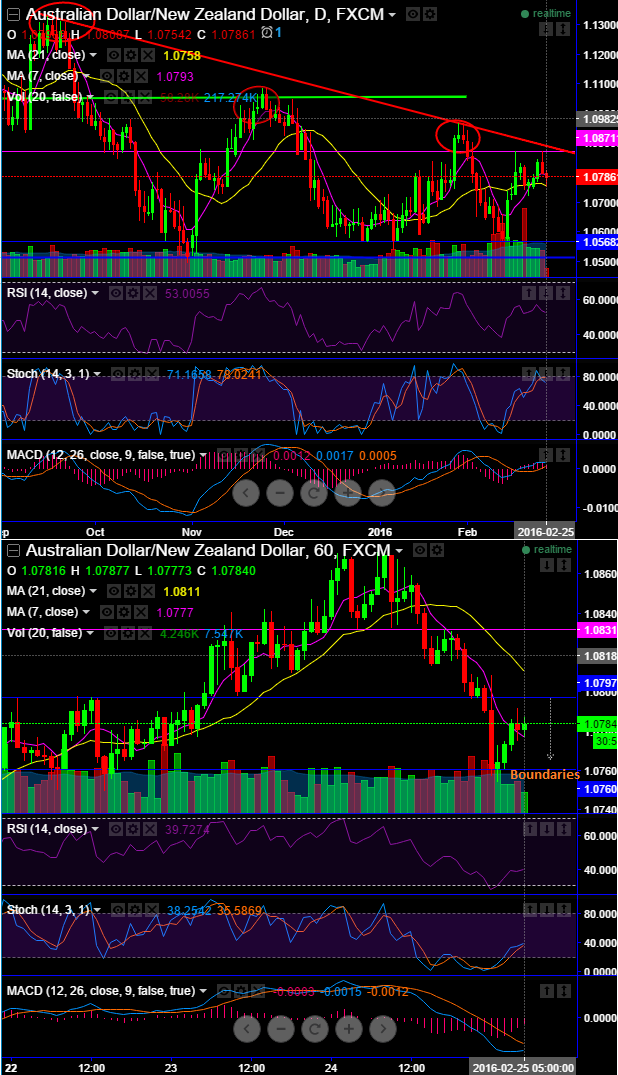
Aussie dollar against Kiwi dollar seems losing momentum in recent gains, for now the pair looks like taking a continuation of 1st half of February's losing streak upto the bottoms of 1.0570 that is where it has tested supports, all signs of making the same attempt of retesting this support as both leading and lagging technical indicators signaling weakness in the recent rallies.
After the yesterday's rejection of resistance of 1.0873, bears are continuing the drag below 7DMA curve.
While both RSI and stochastic oscillators have begun diverging the previous rallies on daily chart, as a result we've been seeing the drop from the yesterday's highs of 1.0873 to today's low of 1.0754 (21DMA), so we could foresee more weakness in the near future.
Despite some negligible upswing pressure we observed selling momentum in recent rallies as the leading oscillator RSI evidences divergence to the previous rallies, (currently, RSI trending healthily at 54.5258 while articulating).
We think it should retest support at 1.0570 and hold decisively if at all the pair has to bounce back to the yesterday's peaks at 1.0873, in between this journey bulls have been disregarding and managed to breach the strong resistance at 1.0871 levels (see sloping trend line where the supply is seen more than demand).
On intraday perspective, currently, the prevailing prices have bounced above both 7MA curve but struggling to show the strength at that stage. Most notably there is a clear crossover of 21MA on 7MA on hourly plotting which is a downtrend continuation signal.
We conduct this technical outlook, the Aussie dollar is close to the bottom of its undervaluation, supporting our view for AUDNZD upside potential.
Trade Tips:
For the day, we emphasize that the range trading (1.0797 - 1.0760) involves predicting whether the price of the trade's underlying asset will end up within this given range. we foresee very less probability of going beyond this range since there are no fundamental news nor a dramatic bullish technical signal.
As you can observe both the daily and intraday chart (1H), day trend being bearish even though it spikes we can see stiff resistance at 1.0797 (by now longer time MA is already curving out shorter time MA along with RSI and Stochs have begun diverging), on the flip side we've seen 1.0760 acting as minor demand zone.
Well, one surefire way to lose money when range trading (or tunnel betting) is to execute trades without doing any research or having any knowledge about the underlying asset's market. Unless you have at least a basic understanding of the factors that influence an asset's value, you'll find it difficult to execute profitable trades on a consistent basis. This is the case with all binary option types.
Also, do not confuse the "boundary option" with "high / low options". It is not the same! But the real money is in boundary options with fixing above stated range.

- News

- Economy

- Central Banks
- Investing
- Research
- Roundups
- Digital Currency
- Insights
- Technical Analysis
- Technology
- Business
- Law
- Health
- Nature
- Fintech
- Science
- Topic
- Opinions
- ©Econometrics LLC . All Rights Reserved.
FxWirePro: AUD/NZD to slip back to supports at 1.0570 to bounce back at trendline resistance of 1.0871
Thursday, February 25, 2016 5:58 AM UTC
Editor's Picks


- Market Data
Most Popular


