


 FxWirePro:USD/JPY holds firm near 160 as intervention fears stay muted
  FxWirePro:GBP/USD recovers some ground but bears are not done yet
  Sterling Surge: GBP/JPY Smashes Above 214 With Triple EMA Blessing; Bulls Eye 217
  FxWirePro- Major European Indices
  FxWirePro- Major Crypto levels and bias summary
  EUR/USD Relief Rally Crashes Into 200/365 EMA Wall: Sell-on-Rise Near 1.1600 Targets 1.1435
  vFxWirePro: GBP/USD changes short term trend from neutral to bearish
  FxWirePro: USD/CAD steadies around 1.3920 level , retains bid tonne
  FxWirePro: USD/CAD dips as Canadian dollar gains slightly after BoC rate decision
  FxWirePro: GBP/NZD up trend gains momentum but hurdles ahead
  FxWirePro: EUR/ NZD sustains gains as uptrend remains strong
  FxWirePro- Major Crypto levels and bias summary
  FxWirePro: USD/CNY holds flat amid concerns over Middle East risks and upcoming U.S. CPI
  FxWirePro: GBP/AUD maintains bullish bias with focus on 1.9100
  FxWirePro: GBP/NZD steadies around 2.3060 , retains bid tone
  FxWirePro: AUD/USD eases as middle east peace progress ebbs


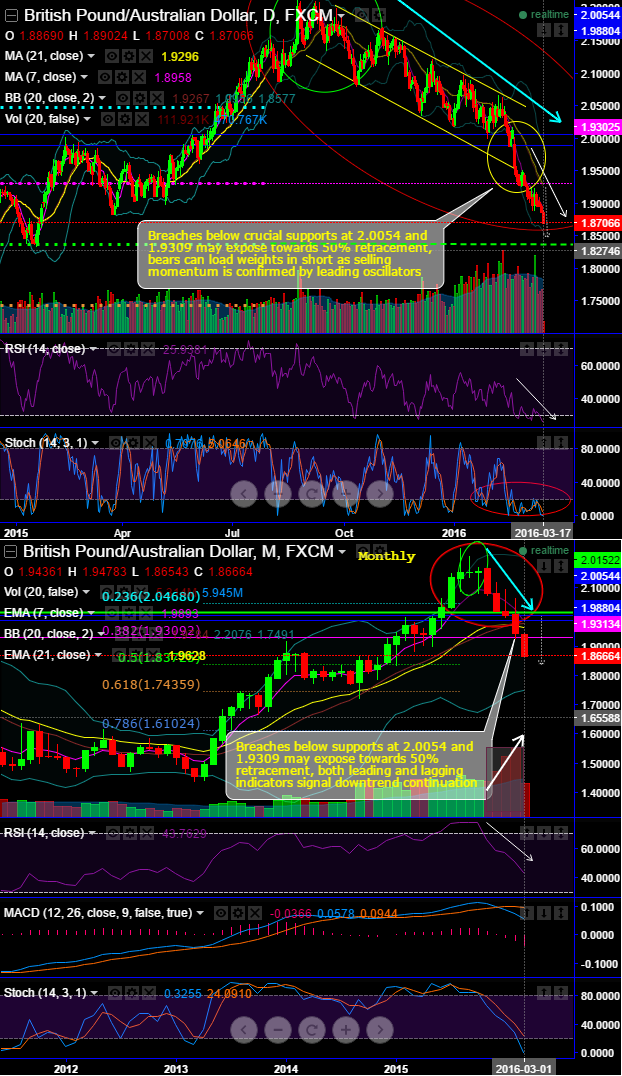
Breaches below crucial supports at 2.0054 and 1.9309 may expose towards 50% retracement, bears can load weights in short as selling momentum is confirmed by leading oscillators.
You see the pair also clears the sloping channel base line that was acted as a baseline from last 6 months or so.
Please be noted that the current prices have slipped below 7 & 21DMAs but within lower BB that signals long term downtrend drag further. So one can very well understand every price jumps would easily be wiped off by selling interests.
Well, on broader perspective, if you observe the better clarity and substantial confirmation of bullish trend reversal after the evidence gravestone doji and hanging man patterns at around 2.1553 and 2.1607 levels on monthly charts that are highly bearish in nature as appeared at peaks of rallies.
These bearish pattern dojis are an extremely helpful for traders visually to see where resistance and supply is likely located and you can see their effects on daily price dips.
RSI on both daily and monthly converges the robust price dips (daily - below 26 & monthly - below 44), while %D crossover on slow stochastic still maintains even oversold trajectory that is one more signal for bearish momentum to continue in long run.
While no deviation from monthly MACD, the lagging indicator also confirms the downtrend continuation.
Hence, at spot ref: 1.8673 (while articulating) we advocate pinocchio strategy using above/below binary puts with OTM strikes of 25-30 pips for intraday speculators in an ongoing bearish environment that is likely to fetch certain yields as we observe 1D IVs are spiking higher with sky rocketed pace ahead of significant economic event by BoE (which is likely to stand pat in its monetary policy).
When we use such leveraged instruments using ATM strikes that are far more sensitive since higher IV greatly increases their chances of expiring ITM. So, we think no other strategy would be deemed as more efficient in such vigorous bearish environment as the payoffs would be exponential on winning trade.


