JPY major currency score with the bearish pairs NZDJPY, GBPJPY, AUDJPY, EURJPY, CHFJPY, CADJPY
  FxWirePro: GBP/AUD extends gains after stronger UK second-quarter growth
  FxWirePro- Woodies Pivot
  FxWirePro- Major Crypto levels and bias summary
  FxWirePro: GBP/USD cedes early gains, outlook bearish
  FxWirePro: BTC/USD Forecast Signals Macro Bull Expansion Toward $200K+ Following 800 EMA Reclaim
  FxWirePro: GBP/AUD loses momentum but outlook is bullish
  Yield Surge Sinks EUR/USD: Technicals Point to Sell-on-Rallies Near 1.1320
  Major pair currency score: EURUSD, NZDUSD, AUDUSD extremely bearish, USDCAD, USDCHF bullish
  FxWirePro: USD/JPY rebounds above 157 as dollar firms
  FxWirePro: USD/CAD sustains gains as uptrend remains strong
  FxWirePro-USD/CHF Technical Outlook: Buying the Dips Near 0.8320 as Dollar Rally Extends
  FxWirePro- Woodies Pivot
  FxWirePro: USD/ZAR climbs as firmer dollar pressures rand
  FxWirePro: USD/ZAR dips as rand firms on stronger economic data
  FxWirePro: AUD/USD trades flat, retains downside bias
  FxWirePro: GBP/NZD sustains gains as uptrend remains strong


 Add as a preferred source on Google
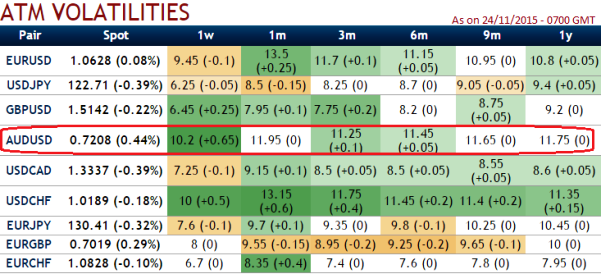
From the table showing implied volatility one can make out, at the money contracts of AUDUSD pair for near month expiry has been highest among G20 currency segment after EURUSD, IV is close to 12% levels for next 1m expiries.
We know that the options with a higher IV cost more, intuitively due to the higher likelihood of the market 'swinging' in your favour.
If IV increases and you are holding an option, this is good. You should also note short-dated options are less sensitive to IV, while long-dated are more sensitive.
Entering into the above recommended AUDUSD positions when implied volatility ticks at around 12% and expecting for the inevitable adjustment is a smart approach, regardless of the direction of price movement. Based on volatility and time decay, the strategy is a "price neutral" approach to options, and one that makes a lot of sense.
Considering the above aspects on speculating grounds, we recommend deploying one touch binary puts in our strategy in order to extract leverage on extended profitability.
The prime merits of such one touch option are high yields during high volatility plays. Wider spreads indicates lack of liquidity. The spreads for one touch AUD/USD options are constant time and barrier levels.
Usually, such binary options for every change in 1 pip the relative change in option price 0.01% or even exponential at high implied volatility times. You can see that in charts how every dips would propel Vega effects.
But on hedging grounds, by employing 2w At-The-Money vega put on long side and 3D ITM put on short side, one can not only monitor the swings on either side but also multiplies returns by twice, thrice or even pour returns exponentially as vega on higher vols most likely to spike up. But do remember these are exclusively for hedging basis.

- News

- Economy

- Central Banks
- Investing
- Research
- Roundups
- Digital Currency
- Insights
- Technical Analysis
- Technology
- Business
- Law
- Health
- Nature
- Fintech
- Science
- Topic
- Opinions
- ©Econometrics LLC . All Rights Reserved.
FxWirePro: Glimpse on AUD/USD’s higher IV and how to beat HY vols
Tuesday, November 24, 2015 11:46 AM UTC
Editor's Picks



- Market Data
Most Popular