


 FxWirePro: NZD/USD gains slightly but bearish outlook remains
  USD/CHF Retreats to Key Trend-Line Wall; Buy-Above-0.8000 Strategy Targets Sharp Rally to 0.8150
  Sterling Surge: GBP/JPY Smashes Above 214 With Triple EMA Blessing; Bulls Eye 217
  FxWirePro- Woodies pivot (Major)
  FxWirePro- Major Crypto levels and bias summary
  FxWirePro- Major Crypto levels and bias summary
  FxWirePro: EUR/AUD jumps as payrolls surprise fuels upside
  NZDJPY Bearish Reversal Intact: Triple EMA Stack Signals Sell-on-Rallies Play Toward 90.50
  FxWirePro: USD/CAD bulls continue to hold the higher ground
  AUD/JPY Dead-Cat Bounce Halted by EMA Wall; Sell-on-Rise Eyes 110.50 Target
  FxWirePro- Major European Indices
  FxWirePro- Woodies pivot (Major)
  FxWirePro: GBP/NZD edges lower but bias is bullish
  AUDJPY Cracks Below 113: Bearish Breakdown Accelerates Toward 110.50 Target
  FxWirePro: GBP/USD hovers near three week low, bearish outlook remains
  FxWirePro: EUR/ NZD bulls gain momentum,eyes level 2.0000


Dear readers, before beginning with this hedging formulation, let's take a look at our previous post on the trend analysis of GBP/AUD.
After going through the above article, we would like you to understand mystification of these puzzling swings. If you compare the prevailing price of GBPAUD (spot FX 2.0995) with the price on 5th October (2.1571) one would not be interested in current upswings.
But there exists the genuine perplexing scenario, isn't this absurd to expect to continues uptrend for last two and half years, as a result we think 23.6% retracement was reasonable.
Currently, it looks like the uptrend is back again, which in turn these price gains could be deemed as recovery swings.
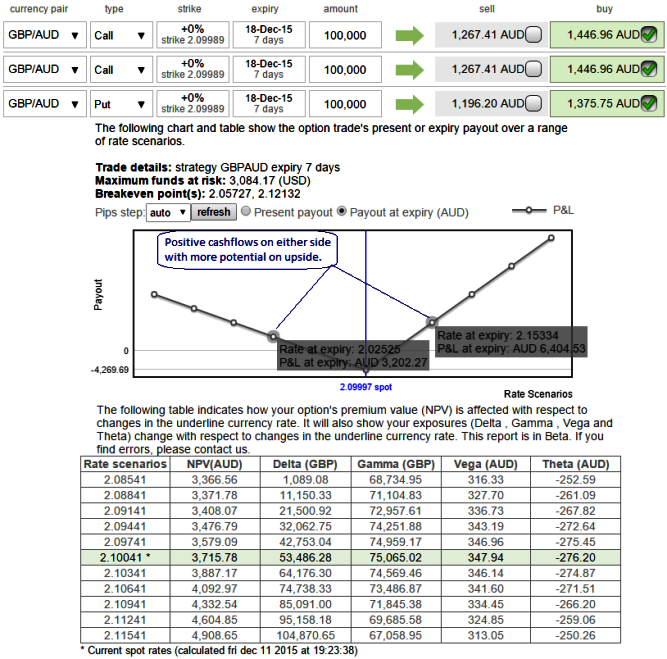
Hedging Perspectives: Option straps (GBPAUD)
Well, it's now the stage of treating the disease after diagnosing.
Subsequently, those who deploy this strategy so as to hedge FX portfolios from ongoing bullish trend and any abrupt slumps as well, can concentrate in their core business areas, and leave mitigating the potential FX risk to us.
For now, the pair has pretty much responded as per earlier bearish anticipation and no hesitation in foreseeing price bounces in near term again as the daily chart suggest some buying interest with least risky scenarios that would result in some price recoveries.
As a result, we recommend building portfolio with longs positions in 2 lots of 0.50 delta ATM calls with 1M expiry and there onwards 1 lot of -0.49 delta ATM puts of 15 expiries. (For demonstrated purpose only we've used identical expiries in the diagram).
Hence, this GBPAUD option strips strategy should take care of any abrupt upswings in short term and certain downswings and yields handsome returns on the downside in long term.
One can observe in the diagram rising delta effects upon rising exchange rate GBPAUD and shrinking as the underlying spot rate dips which means our underlying outrights are fairly hedged against irrespective of rate scenarios.
Delta of far OTM options is very small which is why we've chosen ATM instrument on call. 1-point movement in underling pair will not have much effect on the option premium.


