


 AUDJPY Rejected at 113: Triple EMA Bearish Stack and Surging ADX Point to 110.50
  FxWirePro- Woodies pivot (Major)
  FxWirePro:USD/JPY holds firm near 160 as intervention fears stay muted
  NZDJPY Bulls Capped: Triple Bearish EMA Stack Signals Downtrend Path Toward 90
  NZD/JPY Bear Trap: Triple EMA Ceiling Blocks Relief Rally, Sellers Eye 90.50
  FxWirePro- Major Pair levels and bias summary
  AUD/JPY Dead-Cat Bounce Halted by EMA Wall; Sell-on-Rise Eyes 110.50 Target
  FxWirePro- Major Crypto levels and bias summary
  USD/CHF Retreats to Key Trend-Line Wall; Buy-Above-0.8000 Strategy Targets Sharp Rally to 0.8150
  FxWirePro: USD/ZAR steadies as investors asses Middle East conflict and US CPI figures
  Gold Stalls Below $4150 as Hot CPI Fuels Dollar Strength and Safe-Haven Bid Fades
  FxWirePro: USD/CAD steadies around 1.3920 level , retains bid tonne
  FxWirePro- Woodies pivot (Major)
  Sterling Surge: GBP/JPY Smashes Above 214 With Triple EMA Blessing; Bulls Eye 217
  FxWirePro: NZD/USD gains slightly but bearish outlook remains


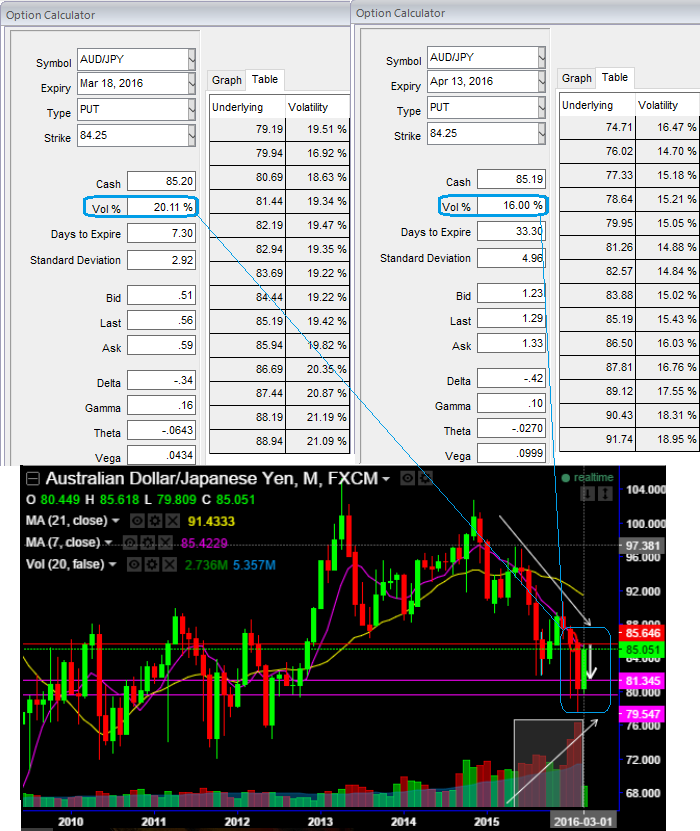
This pair has been oscillating between 85.645 and 84 levels as buying momentum is reduced but long term trend seems to be intact as you can see the convincing volumes and technical indicators favouring bears on monthly charts.
While IVs of ATM contracts of 1w and 1m tenors are spiking crazily and this has been justified by historical volatilities in spot FX fluctuations (see big real body candles on monthly technical charts).
ATM IVs of 1w expiries are flashing at 20.11% and 16% for 1m tenor.
Traders tend to view the put ratio back spread as a bear strategy, because it employs puts. However, it is actually a volatility strategy. The implied volatility of 1M ATM put contract is at 16% and it is quite higher side when long term trend is bearish and spikes in previous rallies for short term which is good sign for option writers.
Traders tend to view the put ratio back spread as a bear strategy, because it employs puts. However, it is actually a volatility strategy.
Options with a higher IV cost more. This is intuitive due to the higher likelihood of the market 'swinging' in your favour. If IV increases and you are holding an option, this is good. You should also note short-dated options are less sensitive to IV, while long-dated are more sensitive.
As we expect the underlying currency exchange rate of AUDJPY to make a larger move on the downside. As shown in the figure purchase 1M 2 lots of At-The-Money -0.52 delta puts and sell 1W one lot of (1%) In-The-Money put option.
So far we all know that the position uses long and short puts in the ratio, such as 2:1 or 3:2 and so on to maximize returns depending upon risk appetite and returns expectations.
Based on volatility and time decay, the strategy is a "price neutral" approach to options, and one that makes a lot of sense.

- News

- Economy

- Central Banks
- Investing
- Research
- Roundups
- Digital Currency
- Insights
- Technical Analysis
- Technology
- Business
- Law
- Health
- Nature
- Fintech
- Science
- Topic
- Opinions
- ©Econometrics LLC . All Rights Reserved.
FxWirePro: AUD/JPY swings move in sync with 1M ATM IVs - rallies and HY vols likely to favour PRBS
Friday, March 11, 2016 6:51 AM UTC
Editor's Picks


- Market Data
Most Popular


