FxWirePro- Woodies Pivot
  FxWirePro: USD/CAD edges lower but outlook is still bullish
  FxWirePro: GBP/AUD steadies above 1.9000, retains bid tone
  EUR/USD Bearish Rebound: Selling the Rallies Near Trendline Resistance
  FxWirePro: EUR/AUD bearish momentum builds ,eyes 1.5900 level
  FxWirePro- Major Crypto levels and bias summary
  FxWirePro- Major Pair levels and bias summary
  Currency Score Update: EURUSD & GBPUSD Bearish, USDCAD Strongest
  FxWirePro: USD/CAD climbs to 18-month peak after sharp Canadian employment decline
  FxWirePro: GBP/NZD uptrend loses momentum but bullish setup remains
  NZD/JPY Double Bottom Signals a Potential Push Toward 90 as 88 Support Holds
  FxWirePro: USD/ZAR uptrend loses steam, remains on bullish path
  FxWirePro: AUD/USD grinds higher, but topside extension unlikely
  AUD/JPY Stays Above 110 as Weak Yen Fuels a Potential Move Toward 112
  FxWirePro: EUR/NZD uptrend looks tired, but continues to hold


 Add as a preferred source on Google
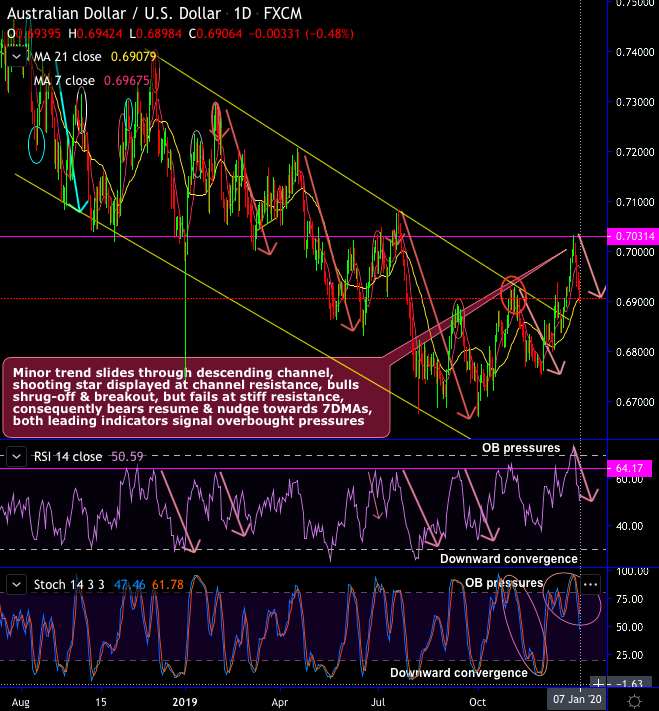
Technical chart and candlestick patterns: AUDUSD short-term trend travels in a descending channel. We traced shooting stars and spinning top patterns in our recent post, that have popped up at 0.6893 and 0.6884 levels respectively to signal weakness at the channel resistance. But the interim bulls have shrugged-off and broken-out the channel resistance successful. We raised our dubious on the sustenance, for now, failure swings are observed at the stiff resistance of 0.7031 levels (refer daily chart). In addition, long-legged doji has occurred at 0.7024 level to signal the weakness (4H chart).
As stated before, the pair has now shown the exhaustiveness in the interim upswings, as a result, prices are plunged back sooner or later.
As both leading oscillators (daily RSI & Stochastic curves) show the overbought pressures to the prevailing resistance signal the fading strength in the previous minor upswings and intensified bearish momentum, more slumps likely upon failure swings.
On a broader perspective, the double top formation with the breach below neckline has been extending the major downtrend of this pair and hit 10 year lows at 0.6675 areas (refer monthly plotting), in the recent past, bearish engulfing candles followed by shooting star patterns plummet prices well below 7EMA again on this timeframe.
The major trend attempts to bounce back but 21-EMA caps upswings, every attempts of upswings are restrained below 7 & 21-EMA levels. The major downtrend remains intact as both lagging indicators bearish bias.
Fundamentally, the outlook for China and its trade conflict with the US remain important drivers for the Aussie dollar. A more relaxed situation on the trade war front, improved risk sentiment, and the more confident stance of the central bank have helped the currency to gain back ground. However, we expect AUDUSD to generally drift in sideways to bearish swings as the macro risks remain intact. Hence, it is wise to stay hedged using below strategy.
Trade tips: On trading perspective, at spot reference: 0.6901 levels, contemplating above technical rationale, it is advisable to execute tunnel options strategy with upper strikes at 0.6942 and lower strikes at 0.6860 levels, thereby, one can fetch certain yields as long as the underlying spot FX keeps dipping but remain above lower strikes on the expiration.
Alternatively, on hedging grounds we advocated shorting futures contracts of mid-month tenors, we uphold the same strategy as the underlying spot FX likely to target southwards below 0.67 levels in the medium run. Writers in a futures contract are expected to maintain margins in order to open and maintain a short futures position.