


 FxWirePro- Major Pair levels and bias summary
  FxWirePro: USD/JPY gains above 160 level ahead of BOJ policy meeting
  FxWirePro: GBP/AUD runs out of steam but maintains bullish outlook
  Ethereum Cracks Under $1,700: Sell the Rally Near $1,750 as Bears Eye $1,380–$1,200
  FxWirePro- Major Crypto levels and bias summary
  FxWirePro: GBP/NZD stuck in range but outlook is bullish
  Relief Rally Extends to 112.75, but AUDJPY EMA Structure Favors Selling
  FxWirePro- Woodies pivot (Major)
  FxWirePro: EUR/ NZD uptrend loses steam, remains on bullish path
  FxWirePro: AUD/USD climbs as US-Iran peace deal sparks risk rally
  FxWirePro- Major European Indices
  FxWirePro: EUR/AUD loses upside momentum but outlook is bullish
  FxWirePro: GBP/USD range-bound as Iran uncertainty keeps traders cautious
  FxWirePro: USD/CAD steadies around 1.3990 ,retains bid one
  FxWirePro: AUD/ USD strongly bearish despite upside attempts


What's cooking with JPY fundamentals: The Bank of Japan (BoJ) decided on surprise measures to qualitatively supplement its QQE without further quantitative easing last week (BoJ reinforces open ended character of QQE without further quantitative easing).
Governor Kuroda at the post-meeting press conference described the decision as a supplementary adjustment rather than additional easing.
Yet, market reactions seem to reflect confusion and concerns about the BoJ's policy communication, which may continue to weigh on USDJPY in the near term as post-Fed gains are being erased.
Data on the focus for today: CPI, unemployment claims, household spending and housing strats are scheduled for today.
On the flip side, the RBA is not yet out of the woods. In particular, as long as China is struggling, a further rate cut is possible.
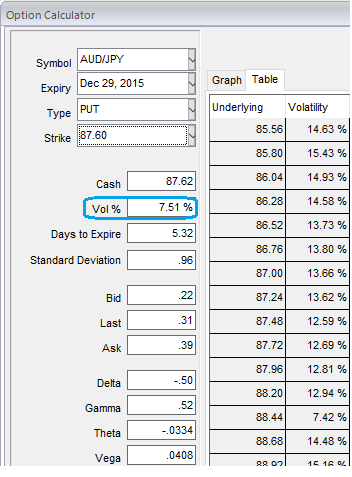
Higher Implied Volatility and Put Ratio Back Spread: AUD/JPY
We know that the options with a higher IV cost more, intuitively due to the higher likelihood of the market 'swinging' in your favor.
The implied volatility of ATM AUDJPY puts of near month contract has reduced from 12.39% to 7.51% that is good sign for option holders (as a result reduced weights in back spreads after benefitting from 2:1 ratios).
You should also note short-dated options are less sensitive to IV, while long-dated are more sensitive.
Traders tend to view the put ratio back spread as a bear strategy corresponding to the current weakness in this pair, because it employs puts. However, it is actually a volatility strategy also. The implied volatility of 1M ATM put contract is at 7.51% and it is quite reasonable to accumulate more.
As we expect the underlying currency exchange rate of AUDJPY to make a larger move on the downside. As shown in the figure purchase 1M 2 lots of At-The-Money -0.52 delta puts and sell 1W one lot of (1%) In-The-Money put option.
Entering into the above recommended AUDJPY positions when implied volatility ticks at around 7.51% and expecting for the inevitable adjustment is a smart approach, regardless of the direction of price movement. Based on volatility and time decay, the strategy is a "price neutral" approach to options, and one that makes a lot of sense.

- News

- Economy

- Central Banks
- Investing
- Research
- Roundups
- Digital Currency
- Insights
- Technical Analysis
- Technology
- Business
- Law
- Health
- Nature
- Fintech
- Science
- Topic
- Opinions
- ©Econometrics LLC . All Rights Reserved.
FxWirePro: Rosy times for AUD/JPY put holders as reduced IV favors vega, 2:1 backspreads to reduce hedging cost
Thursday, December 24, 2015 8:04 AM UTC
Editor's Picks


- Market Data
Most Popular


